Topic to Queue Mapping
6 Minute Read
This tutorial builds on the basic concepts introduced in Persistence with Queues tutorial and will show you how to make use of one of Solace’s advanced queueing features called “Topic to Queue Mapping.”
In addition to spooling messages published directly to the queue, it is possible to add one or more topic subscriptions to a durable queue so that messages published to those topics are also delivered to and spooled by the queue. This is a powerful feature that enables queues to participate equally in point to point and publish / subscribe messaging models. More details about the “Topic to Queue Mapping” feature here.
The following diagram illustrates this feature.
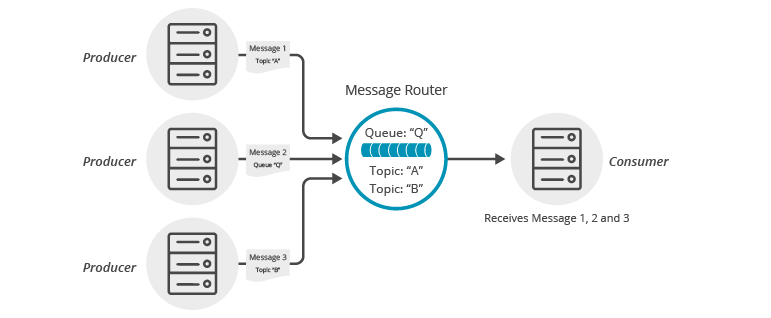
If you have a durable queue named Q, it will receive messages published directly to the queue destination named Q. However, it is also possible to add subscriptions to this queue in the form of topics. This example adds topics A and B. Once these subscriptions are added, the queue will start receiving messages published to the topic destinations A and B. When you combine this with the wildcard support provided by Solace topics this opens up a number of interesting use cases.
Assumptions
This tutorial assumes the following:
- You are familiar with Solace core concepts.
- You understand the basics introduced in Persistence with Queues
- You have access to Solace messaging with the following configuration details:
- Connectivity information for a Solace message-VPN configured for guaranteed messaging support
- Enabled client username and password
- Client-profile enabled with guaranteed messaging permissions.
One simple way to get access to Solace messaging quickly is to create a messaging service in Solace Cloud as outlined here. You can find other ways to get access to Solace messaging below.
Goals
The goal of this tutorial is to understand the following:
- How to add topic subscriptions to a queue
- How to interrogate the Solace message router to confirm capabilities.
Get Solace Messaging
This tutorial requires access Solace messaging and requires that you know several connectivity properties about your Solace messaging. Specifically you need to know the following:
| Resources | Value | Description |
|---|---|---|
| Host | String | This is the address clients use when connecting to the Solace messaging to send and receive messages. (Format: DNS_NAME:Port or IP:Port) |
| Message VPN | String | The Solace message router Message VPN that this client should connect to. |
| Client Username | String | The client username. (See Notes below) |
| Client Password | String | The client password. (See Notes below) |
There are several ways you can get access to Solace Messaging and find these required properties.
Option 1: Use Solace Cloud
-
Follow these instructions to quickly spin up a cloud-based Solace messaging service for your applications.
-
The messaging connectivity information is found in the service details in the connectivity tab (shown below). You will need:
- Host:Port (use the SMF URI)
- Message VPN
- Client Username
- Client Password

Option 2: Start a Solace Event Broker Software
-
Follow these instructions to start the Solace Event Broker Software in leading Clouds, Container Platforms or Hypervisors. The tutorials outline where to download and how to install the Solace Event Broker Software.
-
The messaging connectivity information are the following:
-
Host: <public_ip> (IP address assigned to the VMR in tutorial instructions)
-
Message VPN: default
-
Client Username: sampleUser (can be any value)
-
Client Password: samplePassword (can be any value)
Note: By default, the Solace Event Broker Software "default" message VPN has authentication disabled.
-
Option 3: Get access to a Solace Event Broker Appliance
-
Contact your Solace Event Broker Appliance administrators and obtain the following:
- A Solace Message-VPN where you can produce and consume direct and persistent messages
- The host name or IP address of the Solace appliance hosting your Message-VPN
- A username and password to access the Solace appliance
Obtaining the Solace Messaging API
The latest versions of all Solace APIs can be downloaded from the solace downloads page. Otherwise, check the public samples repository of the API where the library is already packaged as a gzipped tar file. Note: always check for the latest API version!
Connection setup
First, connect to the Solace message router in almost exactly the same way as other tutorials. The difference is explained below.
final JCSMPProperties properties = new JCSMPProperties();
properties.setProperty(JCSMPProperties.HOST, args[0]);
properties.setProperty(JCSMPProperties.USERNAME, args[1].split("@")[0]);
properties.setProperty(JCSMPProperties.VPN_NAME,  args[1].split("@")[1]);
if (args.length > 2) {
    properties.setProperty(JCSMPProperties.PASSWORD, args[2]);
}
// Make sure that the session is tolerant of the subscription<
// already existing on the queue.
properties.setProperty(JCSMPProperties.IGNORE_DUPLICATE_SUBSCRIPTION_ERROR, true);

final JCSMPSession session = JCSMPFactory.onlyInstance().createSession(properties);
session.connect();
The only difference in the above is the duplicate subscription processing boolean. One aspect to consider when adding subscriptions is how your application wishes the Solace API to behave in the face of pre-existing duplicate subscriptions. The default behavior is to throw an exception if an application tries to add a subscription that already exists. In this tutorial, we’ll relax that behavior and change our JCSMPSession so that it will tolerate the subscription already existing. For more details on this session flag, refer to the Solace documentation for the Java API.
Review: Receiving message from a queue
The Persistence with Queues tutorial demonstrated how to publish and receive messages from a queue. In doing this, it used a JCSMPSession, XMLMessageProducer, and Consumer and this sample will do so in the same way. This sample will also depend on the endpoint being provisioned by through the API as was done in the previous tutorial. For clarity, this code is not repeated in the discussion but is included in the full working sample available in the summary section.
Confirming Message Router Capabilities
One convenient feature provided by the Java API is the Session capabilities. When a JCSMPSession connects to a Solace message router, they exchange a set of capabilities to determine levels of support for various API features. This enables the Solace APIs to remain compatible with Solace message routers even as they are upgraded to new loads.
Applications can also make use of these capabilities to programmatically check for required features when connecting. The following code is an example of how this is done for the capabilities required by this tutorial.
if (session.isCapable(CapabilityType.PUB_GUARANTEED) &&
    session.isCapable(CapabilityType.SUB_FLOW_GUARANTEED) &&
    session.isCapable(CapabilityType.ENDPOINT_MANAGEMENT) &&
    session.isCapable(CapabilityType.QUEUE_SUBSCRIPTIONS)) {
    System.out.println("All required capabilities supported!");
} else {
    System.out.println("Capabilities not met!");
    System.exit(1);
}
In this case, the tutorial requires permission to send and receive guaranteed messages, configure endpoints, and manage queue subscriptions. If these capabilities are not available on the message router, the tutorial will not proceed. If these capabilities are missing, you update the client-profile used by the client-username to enable them. See the Solace documentation for details.
Adding a Subscription to a Queue
In order to enable a queue to participate in publish/subscribe messaging, you need to add topic subscriptions to the queue to attract messages. You do this from the JCSMPSession using the addSubscription() method. The queue destination is passed as the first argument and then topic subscription to add and any flags. This example asks the API to block until the subscription is confirmed to be on the Solace message router. The subscription added in this tutorial is T/mapped/topic/sample.
Queue queue = JCSMPFactory.onlyInstance().createQueue("Q/tutorial/topicToQueueMapping");
Topic tutorialTopic = JCSMPFactory.onlyInstance().createTopic("T/mapped/topic/sample");
session.addSubscription(queue, tutorialTopic, JCSMPSession.WAIT_FOR_CONFIRM);
Publish – Subscribe using a Queue
Once the subscription is added to the queue, all that is left to do in this tutorial is to send some messages to your topic and validate that they arrive on the queue. First publish some messages using the following code:
TextMessage msg =  JCSMPFactory.onlyInstance().createMessage(TextMessage.class);
msg.setDeliveryMode(DeliveryMode.PERSISTENT);
for (int i = 1; i <= count; i++) {
    msg.setText("Message number " + i);
    prod.send(msg, tutorialTopic);
}
These messages are now on your queue. You can validate this through Broker Manager by inspecting the queue. Now receive the messages using a flow consumer as outlined in detail in previous tutorials.
ConsumerFlowProperties flow_prop = new ConsumerFlowProperties();
flow_prop.setEndpoint(queue);
Consumer cons = session.createFlow(new SimplePrintingMessageListener(), flow_prop);
cons.start();

try {
    latch.await(); // block here until message received, and latch will flip
} catch (InterruptedException e) {
    System.out.println("I was awoken while waiting");
}
Summarizing
The full source code for this example is available in GitHub. If you combine the example source code shown above results in the following source:
Getting the Source
This tutorial is available in GitHub. To get started, clone the GitHub repository containing the Solace samples.
git clone https://github.com/SolaceSamples/solace-samples-java-jcsmp
cd solace-samples-java-jcsmp
Building
The build instructions in this tutorial assume you are using a Linux shell. If your environment differs, adapt the instructions.
Building these examples is simple. You can simply build the project using Gradle.
./gradlew assembleThis builds all of the Java Getting Started Samples with OS specific launch scripts. The files are staged in the build/staged directory.
Running the Sample
Run the example from the command line as follows.
$ ./build/staged/bin/topicToQueueMapping <host:port> <client-username>@<message-vpn> [client-password]You have now added a topic subscription to a queue and successfully published persistent messages to the topic and had them arrive on your Queue endpoint.