Persistence with Queues
7 Minute Read
This tutorial builds on the basic concepts introduced in the publish/subscribe tutorial, and will show you how to send and receive persistent messages from a Solace message router queue in a point to point fashion.
Assumptions
This tutorial assumes the following:
- You are familiar with Solace core concepts.
- You have access to Solace messaging with the following configuration details:
- Connectivity information for a Solace message-VPN configured for guaranteed messaging support
- Enabled client username and password
- Client-profile enabled with guaranteed messaging permissions
One simple way to get access to Solace messaging quickly is to create a messaging service in Solace Cloud as outlined here. You can find other ways to get access to Solace messaging below.
Goals
The goal of this tutorial is to understand the following:
- How to programmatically create a durable queue on the Solace message router
- How to send a persistent message to a Solace queue
- How to bind to this queue and receive a persistent message
Get Solace Messaging
This tutorial requires access Solace messaging and requires that you know several connectivity properties about your Solace messaging. Specifically you need to know the following:
| Resources | Value | Description |
|---|---|---|
| Host | String | This is the address clients use when connecting to the Solace messaging to send and receive messages. (Format: DNS_NAME:Port or IP:Port) |
| Message VPN | String | The Solace message router Message VPN that this client should connect to. |
| Client Username | String | The client username. (See Notes below) |
| Client Password | String | The client password. (See Notes below) |
There are several ways you can get access to Solace Messaging and find these required properties.
Option 1: Use Solace Cloud
-
Follow these instructions to quickly spin up a cloud-based Solace messaging service for your applications.
-
The messaging connectivity information is found in the service details in the connectivity tab (shown below). You will need:
- Host:Port (use the SMF URI)
- Message VPN
- Client Username
- Client Password

Option 2: Start a Solace Event Broker Software
-
Follow these instructions to start the Solace Event Broker Software in leading Clouds, Container Platforms or Hypervisors. The tutorials outline where to download and how to install the Solace Event Broker Software.
-
The messaging connectivity information are the following:
-
Host: <public_ip> (IP address assigned to the VMR in tutorial instructions)
-
Message VPN: default
-
Client Username: sampleUser (can be any value)
-
Client Password: samplePassword (can be any value)
Note: By default, the Solace Event Broker Software "default" message VPN has authentication disabled.
-
Option 3: Get access to a Solace Event Broker Appliance
-
Contact your Solace Event Broker Appliance administrators and obtain the following:
- A Solace Message-VPN where you can produce and consume direct and persistent messages
- The host name or IP address of the Solace appliance hosting your Message-VPN
- A username and password to access the Solace appliance
Obtaining the Solace Messaging API
The latest versions of all Solace APIs can be downloaded from the solace downloads page. Otherwise, check the public samples repository of the API where the library is already packaged as a gzipped tar file. Note: always check for the latest API version!
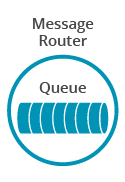
Provisioning a Queue through the API
The first requirement for guaranteed messaging using a Solace message router is to provision a guaranteed message endpoint. For this tutorial we will use a point-to-point queue. To learn more about different guaranteed message endpoints see here.
Durable endpoints are not auto created on Solace message routers. However there are two ways to provision them.
- Using the management interface
- Using the APIs
Using the Solace APIs to provision an endpoint can be a convenient way of getting started quickly without needing to become familiar with the management interface. This is why it is used in this tutorial. However it should be noted that the management interface provides more options to control the queue properties. So generally it becomes the preferred method over time.
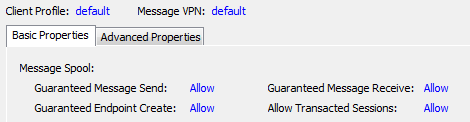
Provisioning an endpoint through the API requires the “Guaranteed Endpoint Create” permission in the client-profile. You can confirm this is enabled by looking at the client profile in Broker Manager. If it is correctly set you will see the following:
Provisioning the queue involves three steps.
- Obtaining a Java API Queue object representing the queue you wish to create.
- Setting the Queue properties that you wish for your queue. This examples permits consumption of messages and sets the queue type to exclusive. More details on queue permissions can be found in the Java developer documentation.
- Provisioning the Queue on the Solace message router
The following code shows you this for the queue named Q/tutorial.
// create the queue object locally
String queueName = "Q/tutorial";
final Queue queue = JCSMPFactory.onlyInstance().createQueue(queueName);

// set queue permissions to "consume" and access-type to "exclusive"
final EndpointProperties endpointProps = new EndpointProperties();
endpointProps.setPermission(EndpointProperties.PERMISSION_CONSUME);
endpointProps.setAccessType(EndpointProperties.ACCESSTYPE_EXCLUSIVE);

// Actually provision it, and do not fail if it already exists
session.provision(queue, endpointProps, JCSMPSession.FLAG_IGNORE_ALREADY_EXISTS);
The ignore already exists flags signals to the API that the application is tolerate of the queue already existing.
Sending a message to a queue
Now it is time to send a message to the queue.
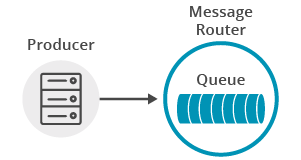
There is really no difference in the actual calls to the JCSMP message producer when sending a persistent message as compared to a direct message shown in the publish/subscribe tutorial. The difference in the persistent message is that the Solace message router will acknowledge the message once it is successfully stored on the message router.
This is still handled by the message producer event handler and again producers can implement either the JCSMPStreamingPublishEventHandler or the JCSMPStreamingPublishCorrelatingEventHandler. The JCSMPStreamingPublishEventHandler is the simplest and is sufficient for demonstrating basic message persistence. The tutorial on handling acknowledgements will get into more advanced acknowledgement handling with proper correlation.
So the message producer creation code can remain the same as shown here:
XMLMessageProducer prod = session.getMessageProducer(new JCSMPStreamingPublishEventHandler() {

    @Override
    public void responseReceived(String messageID) {
        System.out.println("Producer received response for msg: " + messageID);
    }

    @Override
    public void handleError(String messageID, JCSMPException e, long timestamp) {
        System.out.printf("Producer received error for msg: %s@%s - %s%n",messageID,timestamp,e);
    }
});
To send a message, you must still create a message. The main difference from sending a direct message is that you must set the message delivery mode to persistent. When you send the message you also update the call to send to include your queue object as the destination.
final Queue queue = JCSMPFactory.onlyInstance().createQueue("Q/tutorial");
TextMessage msg = JCSMPFactory.onlyInstance().createMessage(TextMessage.class);
msg.setDeliveryMode(DeliveryMode.PERSISTENT);
String text = "Persistent Queue Tutorial! " +
        DateFormat.getDateTimeInstance().format(new Date());
msg.setText(text);
// Delivery not yet confirmed. See ConfirmedPublish.java
prod.send(msg, queue);
At this point the producer has sent a message to the Solace message router and if all goes well it will be waiting for your consumer on the queue. The Confirmed Delivery tutorial shows how to make sure it gets there.
Receiving a message from a queue
Now it is time to receive the messages sent to your queue.
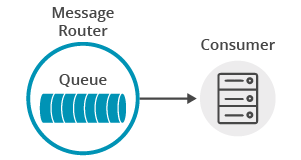
You still need to connect a session just as you did with the publisher. With a connected session, you then need to bind to the Solace message router queue with a flow receiver. Flow receivers allow applications to receive messages from a Solace guaranteed message flow. Flows encapsulate all of the acknowledgement behavior required for guaranteed messaging. Conveniently flow receivers have the same interface as message consumers but flows also require some additional properties on creation.
First a flow requires consumer properties. At its most basic, the consumer flow properties require the queue name and an ack mode. In this example you’ll use the client ack mode where the application will explicitly acknowledge each message.
final ConsumerFlowProperties flow_prop = new ConsumerFlowProperties();
flow_prop.setEndpoint(queue);
flow_prop.setAckMode(JCSMPProperties.SUPPORTED_MESSAGE_ACK_CLIENT);
Next a flow needs some knowledge of the type of queue that it is binding to. This allows the API to confirm with the Solace message router that the endpoint is properly configured for the application. In this example our queue is exclusive so we’ll set that in the endpoint properties.
EndpointProperties endpoint_props = new EndpointProperties();
endpoint_props.setAccessType(EndpointProperties.ACCESSTYPE_EXCLUSIVE);
Both flow properties and endpoint properties are explained in more detail in the Java developer documentation.
Flows are created from Solace session objects just as direct message consumers are. Flows can take up to four arguments during creation:
- An XMLMessageListener asynchronous callback object for receiving the messages
- Consumer flow properties
- Endpoint properties (optional)
- Flow Event Handler (optional)
The following example shows you a basic flow receiver which receives messages, prints them to the console and acknowledges them as consumed back to the Solace message router so it can remove them.
final FlowReceiver cons = session.createFlow(new XMLMessageListener() {
    @Override
    public void onReceive(BytesXMLMessage msg) {
        if (msg instanceof TextMessage) {
            System.out.printf("TextMessage received: '%s'%n", ((TextMessage) msg).getText());
        } else {
            System.out.println("Message received.");
        }
        System.out.printf("Message Dump:%n%s%n", msg.dump());
        // When the ack mode is set to SUPPORTED_MESSAGE_ACK_CLIENT,
        // guaranteed delivery messages are acknowledged after
        // processing
        msg.ackMessage();
        latch.countDown(); // unblock main thread
    }

    @Override
    public void onException(JCSMPException e) {
        System.out.printf("Consumer received exception: %s%n", e);
        latch.countDown(); // unblock main thread
    }
}, flow_prop, endpoint_props);
Then just as with message consumers, you must start your flow so it can begin receiving messages.
cons.start();Then after the consumer is started. At this point the consumer is ready to receive messages.
try {
    latch.await(); // block here until message received, and latch will flip
} catch (InterruptedException e) {
    System.out.println("I was awoken while waiting");
}
Summarizing
The full source code for this example is available in GitHub. If you combine the example source code shown above results in the following source:
Learn how to verify all messages arrive to the Solace message router in our next tutorial, Confirmed Delivery.
Getting the Source
This tutorial is available in GitHub. To get started, clone the GitHub repository containing the Solace samples.
git clone https://github.com/SolaceSamples/solace-samples-java-jcsmp
cd solace-samples-java-jcsmp
Building
The build instructions in this tutorial assume you are using a Linux shell. If your environment differs, adapt the instructions.
Building these examples is simple. You can simply build the project using Gradle.
./gradlew assembleThis builds all of the Java Getting Started Samples with OS specific launch scripts. The files are staged in the build/staged directory.
Running the Sample
First start the QueueProducer to send a message to the queue. Then you can use the QueueConsumer sample to receive the messages from the queue.
$ ./build/staged/bin/queueProducer <host:port> <client-username>@<message-vpn> [client-password]
$ ./build/staged/bin/queueConsumer <host:port> <client-username>@<message-vpn> [client-password]
You have now successfully connected a client, sent persistent messages to a queue and received them from a consumer flow.