Request/Reply
7 Minute Read
This tutorial outlines both roles in the request-response message exchange pattern. It will show you how to act as the client by creating a request, sending it and waiting for the response. It will also show you how to act as the server by receiving incoming requests, creating a reply and sending it back to the client. It builds on the basic concepts introduced in publish/subscribe tutorial.
Assumptions
This tutorial assumes the following:
-
You are familiar with Solace core concepts.
-
You have access to Solace messaging with the following configuration details:
- Connectivity information for a Solace message-VPN
- Enabled client username and password
One simple way to get access to Solace messaging quickly is to create a messaging service in Solace Cloud as outlined here. You can find other ways to get access to Solace messaging below.
Goals
The goals of this tutorial are to understand the following:
- On the requestor side:
- How to create a request
- How to receive a response
- How to use the Solace API to correlate the request and response
- On the replier side:
- How to detect a request expecting a reply
- How to generate a reply message
Get Solace Messaging
This tutorial requires access Solace messaging and requires that you know several connectivity properties about your Solace messaging. Specifically you need to know the following:
| Resources | Value | Description |
|---|---|---|
| Host | String | This is the address clients use when connecting to the Solace messaging to send and receive messages. (Format: DNS_NAME:Port or IP:Port) |
| Message VPN | String | The Solace message router Message VPN that this client should connect to. |
| Client Username | String | The client username. (See Notes below) |
| Client Password | String | The client password. (See Notes below) |
There are several ways you can get access to Solace Messaging and find these required properties.
Option 1: Use Solace Cloud
-
Follow these instructions to quickly spin up a cloud-based Solace messaging service for your applications.
-
The messaging connectivity information is found in the service details in the connectivity tab (shown below). You will need:
- Host:Port (use the SMF URI)
- Message VPN
- Client Username
- Client Password

Option 2: Start a Solace Event Broker Software
-
Follow these instructions to start the Solace Event Broker Software in leading Clouds, Container Platforms or Hypervisors. The tutorials outline where to download and how to install the Solace Event Broker Software.
-
The messaging connectivity information are the following:
-
Host: <public_ip> (IP address assigned to the VMR in tutorial instructions)
-
Message VPN: default
-
Client Username: sampleUser (can be any value)
-
Client Password: samplePassword (can be any value)
Note: By default, the Solace Event Broker Software "default" message VPN has authentication disabled.
-
Option 3: Get access to a Solace Event Broker Appliance
-
Contact your Solace Event Broker Appliance administrators and obtain the following:
- A Solace Message-VPN where you can produce and consume direct and persistent messages
- The host name or IP address of the Solace appliance hosting your Message-VPN
- A username and password to access the Solace appliance
Overview
Request-reply messaging is supported by the Solace message router for all delivery modes. For direct messaging, the Solace APIs provide the Requestor object for convenience. This object makes it easy to send a request and wait for the reply message. It is a convenience object that makes use of the API provided “inbox” topic that is automatically created for each Solace client and automatically correlates requests with replies using the message correlation ID. (See Message Correlation below for more details). On the reply side another convenience method enables applications to easily send replies for specific requests. Direct messaging request reply is the delivery mode that is illustrated in this sample.
Message Correlation
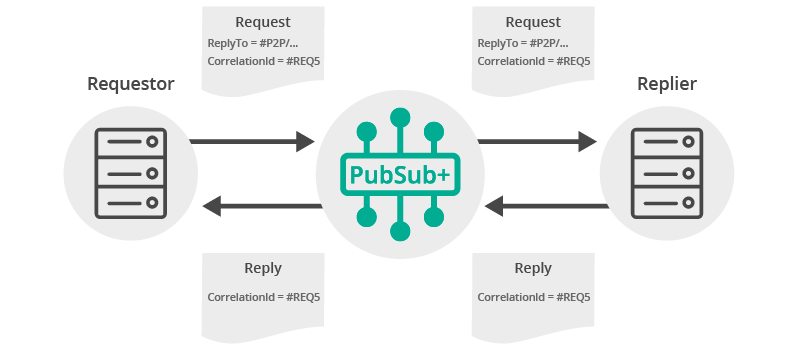
For request-reply messaging to be successful it must be possible for the requestor to correlate the request with the subsequent reply. Solace messages support two fields that are needed to enable request-reply correlation. The reply-to field can be used by the requestor to indicate a Solace Topic where the reply should be sent. A natural choice for this is often the unique P2PINBOX_IN_USE topic which is an auto-generated unique topic per client which is accessible as a session property. The second requirement is to be able to detect the reply message from the stream of incoming messages. This is accomplished using the correlation-id field. This field will transit the Solace messaging system unmodified. Repliers can include the same correlation-id in a reply message to allow the requestor to detect the corresponding reply. The figure below outlines this exchange.
For direct messages however, this is simplified through the use of the Requestor object as shown in this sample.
Obtaining the Solace Messaging API
The latest versions of all Solace APIs can be downloaded from the solace downloads page. Otherwise, check the public samples repository of the API where the library is already packaged as a gzipped tar file. Note: always check for the latest API version!
Implementing Request Reply
This tutorial’s sample code comes as two separate web applications: one (with the “requestor” object) send requests to a specific topic and the other (with the “replier” object) subscribes to requests on that topic, receives the requests and replies on them.
The structure of the requestor application is similar to the publish/subscribe tutorial's topic publisher. Here instead of simply publishing a message, a request will be sent.
The structure of the replier application is similar to the topic subscriber. It differs in that when receiving the request it doesn't only log the message but sends a reply.
The followings are exactly the same as in the publish/subscribe tutorial, refer to it for all the detailed descriptions.
- Loading and Initializing Solace Web Messaging API for JavaScript
- Connecting to the Solace message router
- Session Events
- Integrating the code into a web application
Making a request
First let’s look at the requestor. This is the application that will send the initial request message and wait for the reply.
The requestor must create a message and the topic to send the message to:
var requestText = 'Sample Request';
var request = solace.SolclientFactory.createMessage();
request.setDestination(solace.SolclientFactory.createTopic(requestor.topicName));
request.setSdtContainer(solace.SDTField.create(solace.SDTFieldType.STRING, requestText));
request.setDeliveryMode(solace.MessageDeliveryModeType.DIRECT);
Now the request can be sent. Notice callbacks replyReceivedCb and requestFailedCb. These are functions that will be called when a reply message is received (replyReceivedCb) or sending the request fails (requestFailedCb).
try {
    requestor.session.sendRequest(
        request,
        5000, // 5 seconds timeout for this operation
        function (session, message) {
            requestor.replyReceivedCb(session, message);
        },
        function (session, event) {
            requestor.requestFailedCb(session, event);
        },
        null // not providing correlation object
    );
} catch (error) {
    requestor.log(error.toString());
}
Replying to a request
Now it is time to receive the request and generate an appropriate reply.
Just as with previous tutorials, you still need to connect a session and subscribe to the topics that requests are sent on (the request topic). The following is an example of such a reply.
replier.reply = function (message) {
    if (replier.session !== null) {
        var reply = solace.SolclientFactory.createMessage();
        var ba = message.getBinaryAttachment();
        var replyText = message.getSdtContainer().getValue() + " - Sample Reply";
        reply.setSdtContainer(solace.SDTField.create(solace.SDTFieldType.STRING, replyText));
        replier.session.sendReply(message, reply);
        replier.log('Replied.');
    } else {
        replier.log('Cannot reply: not connected to Solace message router.');
    }
};
The replier.reply is the function that is called from the replier message event listener defined for replier.session:
// define message event listener
replier.session.on(solace.SessionEventCode.MESSAGE, function (message) {
    try {
        replier.reply(message);
    } catch (error) {
        replier.log(error.toString());
    }
});
Receiving the Reply Message
All that’s left is to receive and process the reply message as it is received at the requestor or report a failure:
requestor.replyReceivedCb = function (session, message) {
	requestor.log('Received reply: "' + message.getSdtContainer().getValue() + '"');
};
requestor.requestFailedCb = function (session, event) {
	requestor.log('Request failure: ' + event.toString());
};
Summarizing
Combining the example source code shown above results in the following source code files:
Getting the Source
Clone the GitHub repository containing the Solace samples.
git clone https://github.com/SolaceSamples/solace-samples-javascript
cd solace-samples-javascript/src/basic-samples
Note: the code in the master branch of this repository depends on Solace JavaScript API version 10 or later. If you want to work with an older version clone the branch that corresponds your version.
Installing the Web Messaging API for JavaScript
It is assumed that the lib directory containing the API libraries will be installed at the root of the cloned solace-samples-javascript repository:
cp -R <path_to_unzipped_API_distribution_package>/lib/ .Running the Samples
The samples consist of two separate requestor and replier browser applications, each comes as a pair: one HTML file and one JavaScript file that is loaded by the HTML file.
Sample Output
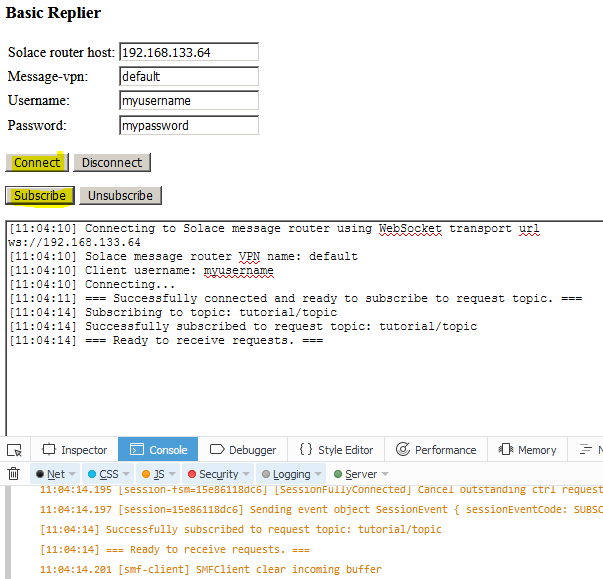
First open BasicReplier/BasicReplier.html page in the browser and connect to a Solace message router by specifying the router’s URL and clicking “Connect” button. Then subscribe to the subscription topic by clicking the “Subscribe” button.
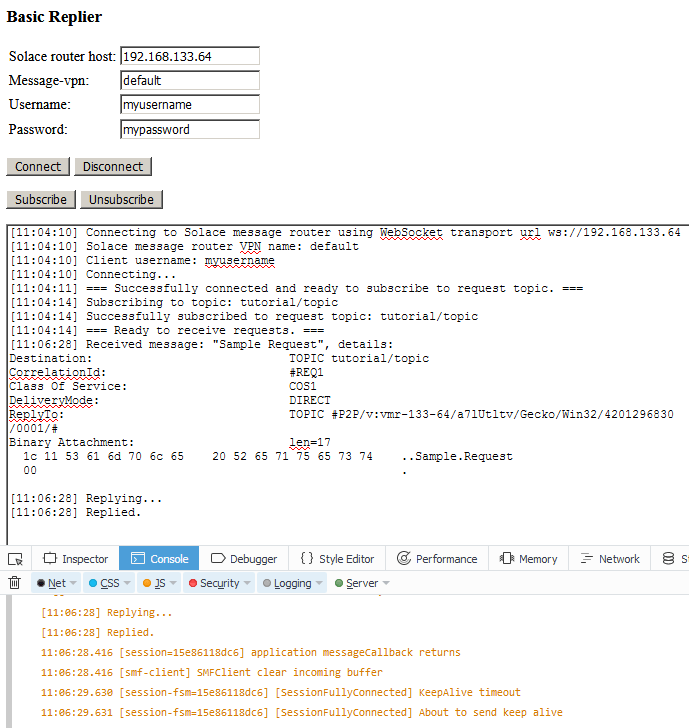
The following is a screenshot of the tutorial’s BasicReplier/BasicReplier.html web page with the JavaScript debug console open in the Firefox browser. It captures the page after it was loaded and the “Connect” button was clicked and then the “Subscribe” button was clicked.
Now, open BasicRequestor/BasicRequestor.html page in the browser and connect to the same Solace message router as the BasicReplier specifying the router’s URL and clicking “Connect” button. Then send the request by clicking the “Send Request” button on the BasicRequestor/BasicRequestor.html page.
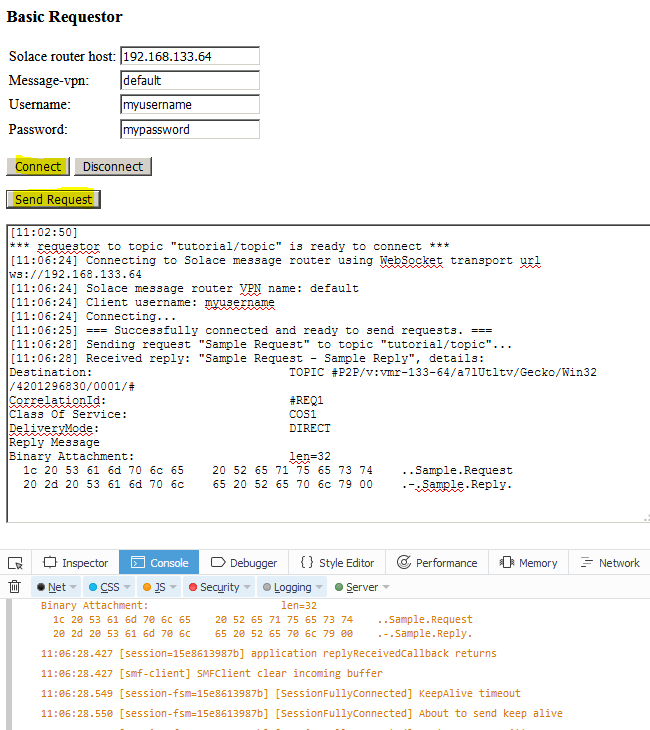
The following screenshots of the tutorial’s BasicRequestor/BasicRequestor.html and BasicReplier/BasicReplier.html web pages with the JavaScript debug console open in the Firefox browser. It captures the pages after a request was sent and replied.
This is the requestor is having sent a request and receiving a reply (BasicRequestor/BasicRequestor.html):
This is the replier is receiving the request and replying to it (BasicReplier/BasicReplier.html):
With that you now know how to successfully implement request-reply message exchange pattern using Direct messages.