Topic to Queue Mapping
10 Minute Read
This tutorial builds on the basic concepts introduced in Persistence with Queues tutorial and will show you how to make use of one of Solace’s advanced queueing features called “Topic to Queue Mapping.”
In addition to spooling messages published directly to the queue, it is possible to add one or more topic subscriptions to a durable queue so that messages published to those topics are also delivered to and spooled by the queue. This is a powerful feature that enables queues to participate equally in point to point and publish / subscribe messaging models. More details about the “Topic to Queue Mapping” feature here.
The following diagram illustrates this feature.
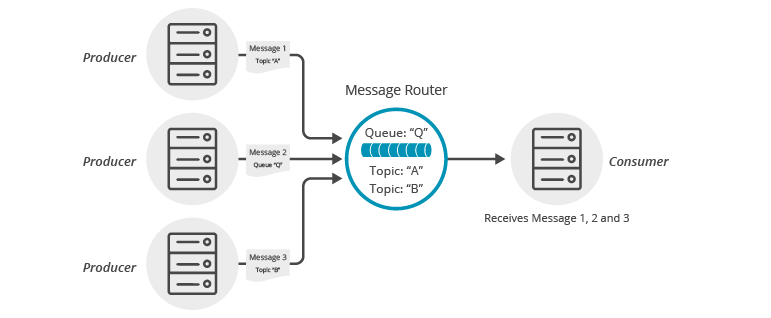
If you have a durable queue named Q, it will receive messages published directly to the queue destination named Q. However, it is also possible to add subscriptions to this queue in the form of topics. This example adds topics A and B. Once these subscriptions are added, the queue will start receiving messages published to the topic destinations A and B. When you combine this with the wildcard support provided by Solace topics this opens up a number of interesting use cases.
Assumptions
This tutorial assumes the following:
- You are familiar with Solace core concepts.
- You understand the basics introduced in Persistence with Queues
- You have access to Solace messaging with the following configuration details:
- Connectivity information for a Solace message-VPN configured for guaranteed messaging support
- Enabled client username and password
- Client-profile enabled with guaranteed messaging permissions.
One simple way to get access to Solace messaging quickly is to create a messaging service in Solace Cloud as outlined here. You can find other ways to get access to Solace messaging below.
Goals
The goal of this tutorial is to understand the following:
- How to add topic subscriptions to a queue
- How to interrogate the Solace message broker to confirm capabilities.
Get Solace Messaging
This tutorial requires access Solace messaging and requires that you know several connectivity properties about your Solace messaging. Specifically you need to know the following:
| Resources | Value | Description |
|---|---|---|
| Host | String | This is the address clients use when connecting to the Solace messaging to send and receive messages. (Format: DNS_NAME:Port or IP:Port) |
| Message VPN | String | The Solace message router Message VPN that this client should connect to. |
| Client Username | String | The client username. (See Notes below) |
| Client Password | String | The client password. (See Notes below) |
There are several ways you can get access to Solace Messaging and find these required properties.
Option 1: Use Solace Cloud
-
Follow these instructions to quickly spin up a cloud-based Solace messaging service for your applications.
-
The messaging connectivity information is found in the service details in the connectivity tab (shown below). You will need:
- Host:Port (use the SMF URI)
- Message VPN
- Client Username
- Client Password

Option 2: Start a Solace Event Broker Software
-
Follow these instructions to start the Solace Event Broker Software in leading Clouds, Container Platforms or Hypervisors. The tutorials outline where to download and how to install the Solace Event Broker Software.
-
The messaging connectivity information are the following:
-
Host: <public_ip> (IP address assigned to the VMR in tutorial instructions)
-
Message VPN: default
-
Client Username: sampleUser (can be any value)
-
Client Password: samplePassword (can be any value)
Note: By default, the Solace Event Broker Software "default" message VPN has authentication disabled.
-
Option 3: Get access to a Solace Event Broker Appliance
-
Contact your Solace Event Broker Appliance administrators and obtain the following:
- A Solace Message-VPN where you can produce and consume direct and persistent messages
- The host name or IP address of the Solace appliance hosting your Message-VPN
- A username and password to access the Solace appliance
Obtaining the Solace Messaging API
The latest versions of all Solace APIs can be downloaded from the solace downloads page. Otherwise, check the public samples repository of the API where the library is already packaged as a gzipped tar file. Note: always check for the latest API version!
Loading and Initializing the Solace JavaScript API
To load the Solace Web Messaging API for JavaScript on your HTML page simply include the solclient.js file from the distribution.
<head>
     <script src="../../../lib/solclient.js"></script>
</head>
Use the debug version of the API in lib/solclient-debug.js file instead, if you’re planning to see console log messages and/or debug it.
<head>
    <script src="../../../lib/solclient-debug.js"></script>
</head>
Then initialize the SolclientFactory, which is the first entry point to the API. Add the following to initialize with the latest version10 behavior profile to run with the default property values that Solace recommends at the time of the version 10 release.
var factoryProps = new solace.SolclientFactoryProperties();
factoryProps.profile = solace.SolclientFactoryProfiles.version10;
solace.SolclientFactory.init(factoryProps);
If the debug version of the API has been loaded the required level of logging can be set like so:
solace.SolclientFactory.setLogLevel(solace.LogLevel.DEBUG);Connecting to the Solace message broker
In order to send or receive messages, an application must connect a Solace session. The Solace session is the basis for all client communication with the Solace message broker.
The solace.SolclientFactory is used to create a Solace Session from SessionProperties. In the example below, SessionProperties is created using object initializers.
Then listeners are defined for Session Events of interest and for receiving direct messages, which are explained in the next sections.
The created session connects to the Solace message broker with the session.connect() call.
This tutorial’s sample code comes as two separate applications: one (with the "publisher" object) publishes messages to a specific topic, and the other (with the "subscriber" object) subscribes to messages on that topic and receives the messages.
The following is an example of a session creating and connecting to the Solace message broker for the subscriber. The publisher's code will be the same except for that it doesn't require a message event listener.
// create session
subscriber.session = solace.SolclientFactory.createSession({
    // solace.SessionProperties
    url:      hosturl,
    vpnName:  vpn,
    userName: username,
    password: pass,
});
// define session event listeners
    /*...see section Session Events...*/
// define message event listener
    /*...see section Receiving a message...*/
// connect the session
try {
    subscriber.session.connect();
} catch (error) {
    subscriber.log(error.toString());
}
At this point your nodejs application is connected as a client to the Solace message broker. You can use SolAdmin to view this client connection and related details.
Session Events
The Solace Web Messaging API for JavaScript communicates changes in status and results of connect and subscription calls through emitting session events with certain event names.
It is necessary to wire your application logic to events through listeners to take appropriate action. The most important events are:
SessionEventCode.UP_NOTICE: success connecting session to the Solace message brokerSessionEventCode.CONNECT_FAILED_ERROR: unable to connect to the Solace message brokerSessionEventCode.DISCONNECTED: session was disconnected from the Solace message broker
This is how event listeners can be defined in the sample subscriber:
// define session event listeners
subscriber.session.on(solace.SessionEventCode.UP_NOTICE, function (sessionEvent) {
    subscriber.log('=== Successfully connected and ready to publish messages. ===');
});
subscriber.session.on(solace.SessionEventCode.CONNECT_FAILED_ERROR, function (sessionEvent) {
    subscriber.log('Connection failed to the message broker: ' + sessionEvent.infoStr +
        ' - check correct parameter values and connectivity!');
});
subscriber.session.on(solace.SessionEventCode.DISCONNECTED, function (sessionEvent) {
    subscriber.log('Disconnected.');
    if (subscriber.session !== null) {
        subscriber.session.dispose();
        subscriber.session = null;
    }
});
Receiving a message from a queue
Now it is time to receive the messages sent to your queue.
Receiving guaranteed messages is different from the direct messaging case described in the the publish/subscribe tutorial.
To receive guaranteed messages, a connected Session is used to create a Solace MessageConsumer object from MessageConsumerProperties and then connected, meaning that it will bind to the queue on the message broker and can start receiving messages.
// Create message consumer
subscriber.messageSubscriber = subscriber.session.createMessageConsumer({
    // solace.MessageConsumerProperties
    queueDescriptor: { name: subscriber.queueName, type: solace.QueueType.QUEUE },
    acknowledgeMode: solace.MessageConsumerAcknowledgeMode.CLIENT, // Enabling Client ack
    createIfMissing: true // Create queue if not exists
});
// define message consumer event listeners
    /*...see section Message Consumer Events...*/
// define message received event listener
    /*...see section Message Consumer Message Received Event...*/
// connect the message consumer
try {
    subscriber.messageSubscriber.connect();
} catch (error) {
    subscriber.log(error.toString());
}
Notice that here we use the Solace "Client acknowledgement mode", which allows the consumers to acknowledge each message individually. You can learn more about acknowledgement modes in the Solace Documentation – Acknowledging Messages Received by Clients.
acknowledgeMode: solace.MessageConsumerAcknowledgeMode.CLIENT, // Enabling Client ackWe also want to create the queue if it is found missing on the Broker, so we set the "createIfMissing" flag to true.
createIfMissing: true // Create queue if not existsMessage Consumer Events
Message consumer related events will be sent to the event listeners defined for the MessageConsumer. The most important events are:
MessageConsumerEventName.UP: the message consumer has successfully bound to the destination and ready to receive messagesMessageConsumerEventName.CONNECT_FAILED_ERROR: the message consumer has not been able to bind to the destinationMessageConsumerEventName.DOWN: the message consumer has been disconnected.
// Define message consumer event listeners
subscriber.messageSubscriber.on(solace.MessageConsumerEventName.UP, function () {
    subscriber.consuming = true;
    subscriber.log('=== Ready to receive messages. ===');
});
subscriber.messageSubscriber.on(solace.MessageConsumerEventName.CONNECT_FAILED_ERROR, function () {
    subscriber.consuming = false;
    subscriber.log('=== Error: the message consumer could not bind to queue "' + subscriber.queueName +
        '" ===\n   Ensure this queue exists on the message broker');
});
subscriber.messageSubscriber.on(solace.MessageConsumerEventName.DOWN, function () {
    subscriber.consuming = false;
    subscriber.log('=== An error happened, the message consumer is down ===');
});
Adding subscriptions to the Message Consumer
We can add subscriptions to the MessageConsumer to attract events on a specific topic.
subscriber.messageSubscriber.addSubscription(
    solace.SolclientFactory.createTopicDestination(subscriber.topicName),
    subscriber.topicName, // correlation key as topic name
    10000 // 10 seconds timeout for this operation
);
Notice parameters to the session addSubscription function.
- The first parameter is the
solace.Destinationcreated from the topic name. - The second (Object | String | null | undefined) parameter specifies a correlation key. If specified, this value is echoed within
MessageConsumerEvent. - The third parameter is the request timeout period (in milliseconds). If specified, this value overwrites
readTimeoutInMsecsproperty inSessionProperties.
After the subscription is successfully added the subscriber is ready to receive messages and nothing happens until a message is received.
Message Consumer Subscription Events
Message consumer subscription related events will be sent to the event listeners defined for the MessageConsumer. The important events are:
MessageConsumerEventName.SUBSCRIPTION_OK: the message consumer has successfully added subscription to the queue on the message broker and will receive messages on the subscribed topicMessageConsumerEventName.SUBSCRIPTION_ERROR: the message consumer subscription failed as the message broker rejected the queue subscription
// Define message consumer event listeners
subscriber.messageSubscriber.on(solace.MessageConsumerEventName.SUBSCRIPTION_OK, function (sessionEvent) {
    subscriber.log('=== Ready to receive messages. ===\n' +
                    'Correlation key - ' + sessionEvent.correlationKey);
});
subscriber.messageSubscriber.on(solace.MessageConsumerEventName.SUBSCRIPTION_ERROR, function (sessionEvent) {
  subscriber.log('Cannot subscribe to topic ' + sessionEvent.reason);
});
Message Consumer Message Received Event
Message received events will be sent to the message received event listener defined for the message consumer. Successful processing of a message must be explicitly acknowledged because "client acknowledgement mode" is used:
// Define message received event listener
subscriber.messageSubscriber.on(solace.MessageConsumerEventName.MESSAGE, function (message) {
    subscriber.log('Received message: "' + message.getBinaryAttachment() + '",' +
        ' details:\n' + message.dump());
    // Need to explicitly ack otherwise it will not be deleted from the message broker
    message.acknowledge();
});
Summarizing
Getting the Source
Clone the GitHub repository containing the Solace samples.
git clone https://github.com/SolaceSamples/solace-samples-nodejs
cd solace-samples-nodejs
Note: the code in the master branch of this repository depends on Solace Node.js API version 10 or later. If you want to work with an older version clone the branch that corresponds your version.
Installing the Node.js API
For a local installation of the API package, run from the current solace-samples-nodejs directory:
npm installRunning the Samples
The samples consist of two separate producer and consumer Node.js applications in the /src/basic-samples directory: GuaranteedProducer.js and GuaranteedConsumer.js.
The producer application sends one message and exits, the consumer application is running until Ctrl-C is pressed on the console.
Sample Output
First run GuaranteedConsumer.js in Node.js, giving it following arguments:
node GuaranteedConsumer.js <protocol://host:port> <client-username>@<message-vpn> <client-password>The following is the output of the tutorial’s GuaranteedConsumer.js application after it successfully connected to the Solace message router and bound to the queue.
$ node GuaranteedConsumer.js ws://192.168.133.64 testuser@default passw
[16:08:25] *** Consumer to queue "tutorial/queue" is ready to connect ***
[16:08:25] Connecting to Solace Event Broker using url: ws://localhost:8008
[16:08:25] Client username: default
[16:08:25] Solace Event Broker VPN name: default
[16:08:25] Press Ctrl-C to exit
[16:08:25] === Successfully connected and ready to start the message subscriber. ===
[16:08:25] Starting subscriber for queue: tutorial/queue
[16:08:26] Subscribing to topic: solace/samples/nodejs/pers/>
[16:08:26] === Ready to receive messages. ===
[16:08:26] Successfully subscribed to topic: solace/samples/nodejs/pers/>
[16:08:26] === Ready to receive messages. ===
Now, run GuaranteedPublisher.js in Node.js, also specifying the same arguments.
node GuaranteedPublisher.js <protocol://host:port> <client-username>@<message-vpn> <client-password>It will connect to the router, send a message and exit.
The following is the output of the tutorial’s GuaranteedPublisher.js application after it successfully connected to the Solace message router, published a message and exited.
$ node GuaranteedPublisher.js ws://192.168.133.64 testuser@default passw
[16:09:20] *** publisher to topic "solace/samples/nodejs/pers" is ready to connect ***
[16:09:20] Connecting to Solace Event Broker using url: ws://localhost:8008
[16:09:20] Client username: default
[16:09:20] Solace Event Broker VPN name: default
[16:09:20] === Successfully connected and ready to publish messages. ===
[16:09:20] Publishing message "Sample Message" to topic "solace/samples/nodejs/pers/1675939160521"...
[16:09:20] Message sent with correlation key: 1675939160521
[16:09:21] Delivery of message to Solace Event Broker with correlation key = 1675939160521 confirmed.
[16:09:21] Disconnecting from Solace Event Broker...
[16:09:21] Disconnected.
This is the subscriber receiving a message (GuaranteedConsumer.js):
[16:09:20] Received message: "Sample Message", details:
Destination:                            [Topic solace/samples/nodejs/pers/1675939160521]
Class Of Service:                       COS1
DeliveryMode:                           PERSISTENT
Message Id:                             2
Replication Group Message Id:           rmid1:1f1c9-4e4ad6d2212-00000000-00000002
Binary Attachment:                      len=14
  53 61 6d 70 6c 65 20 4d    65 73 73 61 67 65          Sample.Message
With that you now know how to successfully implement topic to queue mapping using publish-subscribe message exchange pattern using Guaranteed messages.