Persistence with Queues
6 Minute Read
This tutorial builds on the basic concepts introduced in the publish/subscribe tutorial, and will show you how to send and receive persistent messages with Apache Qpid JMS 2.0 API client using AMQP and Solace messaging.
At the end, this tutorial walks through downloading and running the sample from source.
This tutorial focuses on using a non-Solace JMS API implementation. For using the Solace JMS API see Solace Getting Started JMS Tutorials.
Assumptions
This tutorial assumes the following:
- You are familiar with Solace core concepts.
- You have access to Solace messaging with the following configuration details:
- Connectivity information for a Solace message-VPN configured for guaranteed messaging support
- Enabled client username and password
- Client-profile enabled with guaranteed messaging permissions.
One simple way to get access to Solace messaging quickly is to create a messaging service in Solace Cloud as outlined here. You can find other ways to get access to Solace messaging below.
Goals
The goal of this tutorial is to demonstrate how to use Apache Qpid JMS 2.0 API over AMQP using Solace messaging. This tutorial will show you:
- How to send a persistent message to a durable queue using Solace messaging
- How to bind to this queue and receive a persistent message
Get Solace Messaging
This tutorial requires access Solace messaging and requires that you know several connectivity properties about your Solace messaging. Specifically you need to know the following:
| Resources | Value | Description |
|---|---|---|
| Host | String | This is the address clients use when connecting to the Solace messaging to send and receive messages. (Format: DNS_NAME:Port or IP:Port) |
| Message VPN | String | The Solace message router Message VPN that this client should connect to. |
| Client Username | String | The client username. (See Notes below) |
| Client Password | String | The client password. (See Notes below) |
There are several ways you can get access to Solace Messaging and find these required properties.
Option 1: Use Solace Cloud
-
Follow these instructions to quickly spin up a cloud-based Solace messaging service for your applications.
-
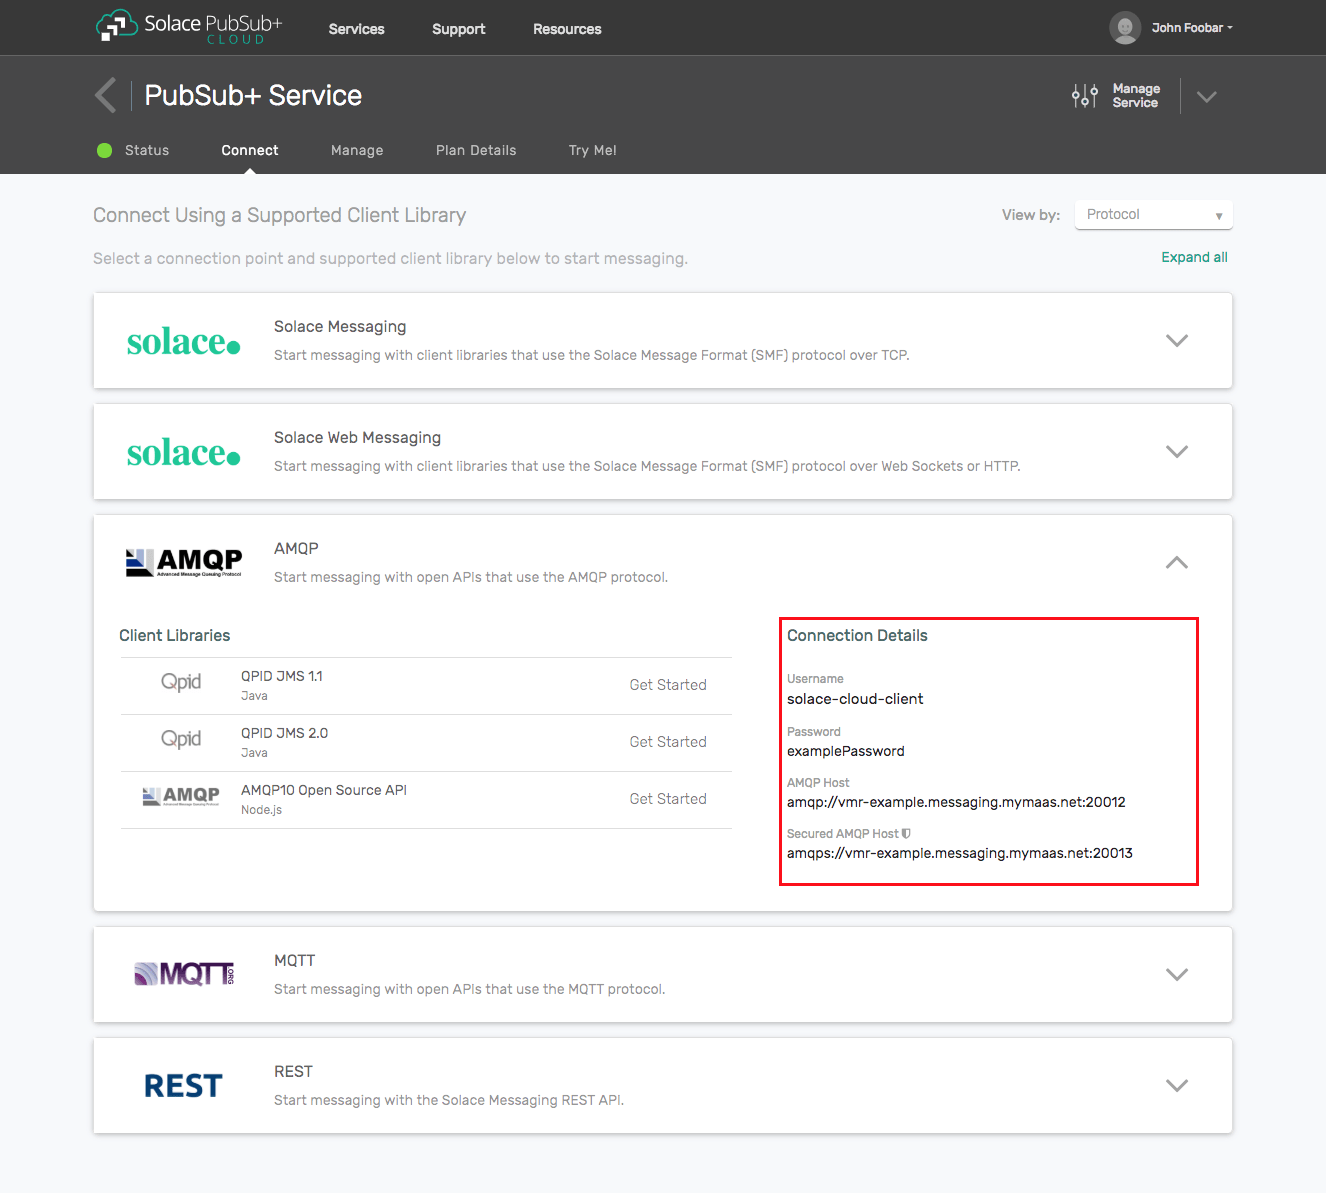
The messaging connectivity information is found in the service details in the connectivity tab (shown below). You will need:
- Host:Port (use the SMF URI)
- Message VPN
- Client Username
- Client Password
Option 2: Start a Solace Event Broker Software
-
Follow these instructions to start the Solace Event Broker Software in leading Clouds, Container Platforms or Hypervisors. The tutorials outline where to download and how to install the Solace Event Broker Software.
-
The messaging connectivity information are the following:
-
Host: <public_ip> (IP address assigned to the VMR in tutorial instructions)
-
Message VPN: default
-
Client Username: sampleUser (can be any value)
-
Client Password: samplePassword (can be any value)
Note: By default, the Solace Event Broker Software "default" message VPN has authentication disabled.
-
Option 3: Get access to a Solace Event Broker Appliance
-
Contact your Solace Event Broker Appliance administrators and obtain the following:
- A Solace Message-VPN where you can produce and consume direct and persistent messages
- The host name or IP address of the Solace appliance hosting your Message-VPN
- A username and password to access the Solace appliance
Obtaining Apache Qpid JMS
This tutorial assumes you have downloaded and successfully installed the Apache Qpid JMS client. If your environment differs from the example, then adjust the build instructions appropriately.
The easiest way to install it is through Gradle or Maven.
Get the API: Using Gradle
dependencies {
    compile("org.apache.qpid:qpid-jms-client:1.6.0")
}
Get the API: Using Maven
<dependency>
    <groupId>org.apache.qpid</groupId>
    <artifactId>qpid-jms-client</artifactId>
    <version>1.6.0</version>
</dependency>
Java Messaging Service (JMS) Introduction
JMS is a standard API for sending and receiving messages. As such, in addition to information provided on the Solace developer portal, you may also look at some external sources for more details about JMS. The following are good places to start
- https://docs.oracle.com/javaee/7/api/javax/jms/package-summary.html
- https://en.wikipedia.org/wiki/Java_Message_Service
- https://docs.oracle.com/javaee/7/tutorial/partmessaging.htm#GFIRP3
The last (Oracle docs) link points you to the JEE official tutorials which provide a good introduction to JMS.
This tutorial focuses on using JMS 2.0 (May 21, 2013), for JMS 1.1 (April 12, 2002) see Solace Getting Started AMQP JMS 1.1 Tutorials.
Connecting to the Solace Messaging
In order to send or receive messages, an application must start a JMS connection and a session.
There are three parameters for establishing the JMS connection: the Solace messaging host name with the AMQP service port number, the client username and the optional password.
QueueProducer.java/QueueConsumer.java
String solaceHost = args[0];
ConnectionFactory connectionFactory = new JmsConnectionFactory(solaceUsername, solacePassword, solaceHost);
Notice how Apache Qpid JMS 2.0 API combines Connection and Session objects into the JMSContext object.
QueueProducer.java/QueueConsumer.java
JMSContext context = connectionFactory.createContext()The session created by the JMSContext object by default is non-transacted and uses the acknowledge mode that automatically acknowledges a client's receipt of a message.
At this point the application is connected to Solace messaging and ready to send and receive messages.
Sending a persistent message to a queue
In order to send a message to a queue a JMS Producer needs to be created.
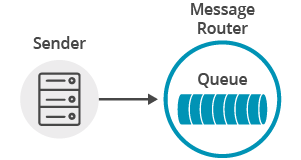
There is no difference in the actual method calls to the JMS producer when sending a JMS persistent message as compared to a JMS non-persistent message shown in the publish/subscribe tutorial. The difference in the JMS persistent message is that Solace messaging will acknowledge the message once it is successfully stored by Solace messaging and the Producer.send() call will not return until it has successfully received this acknowledgement. This means that in JMS, all calls to the Producer.send() are blocking calls and they wait for message confirmation from Solace messaging before proceeding. This is outlined in the JMS specification and Solace JMS adheres to this requirement.
See Configuring Queues for details on how to configure durable queues on Solace Message Routers with Solace CLI.
See Management Tools for other tools for configure durable queues.
The JMS 2.0 API allows the use of method chaining to create the producer, set the delivery mode and send the message.
QueueProducer.java
final String QUEUE_NAME = "Q/tutorial";

Queue queue = context.createQueue(QUEUE_NAME);
TextMessage message = context.createTextMessage("Hello world Queues!");
context.createProducer().setDeliveryMode(DeliveryMode.PERSISTENT).send(queue, "Hello world Queues!");
Receiving a persistent message from a queue
To receive a persistent message from a queue a JMS Consumer needs to be created.
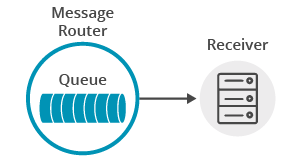
The JMS 2.0 API allows the use of method chaining to create the consumer and receive messages sent to the subscribed queue.
QueueConsumer.java
final String QUEUE_NAME = "Q/tutorial";

Queue queue = context.createQueue(QUEUE_NAME);
Message message = context.createConsumer(queue).receive();
Summarizing
Combining the example source code shown above results in the following source code files:
Getting the Source
Clone the GitHub repository containing the Solace samples.
git clone https://github.com/SolaceSamples/solace-samples-amqp-qpid-jms2
cd solace-samples-amqp-qpid-jms2
Building
You can build and run both example files directly from Eclipse or with Gradle.
./gradlew assembleThe examples can be run as:
cd build/staged/bin
./queueConsumer amqp://<HOST:AMQP_PORT> <USERNAME> <PASSWORD>
./queueProducer amqp://<HOST:AMQP_PORT> <USERNAME> <PASSWORD>
Sample Output
First start the QueueConsumer so that it is up and waiting for messages.
$ queueConsumer amqp://<HOST:AMQP_PORT> <USERNAME> <PASSWORD>
QueueConsumer is connecting to Solace router amqp://<HOST:AMQP_PORT>...
Connected with username 'clientUsername'.
Awaiting message...
Then you can start the QueueProducer to send the message.
$ queueProducer amqp://<HOST:AMQP_PORT> <USERNAME> <PASSWORD>
QueueProducer is connecting to Solace router amqp://<HOST:AMQP_PORT>...
Connected with username 'clientUsername'.
Sending message 'Hello world Queues!' to queue 'Q/tutorial'...
Sent successfully. Exiting...
Notice how the message is received by the QueueReceiver.
Awaiting message...
TextMessage received: 'Hello world Queues!'
Message Content:
JmsTextMessage { org.apache.qpid.jms.provider.amqp.message.AmqpJmsTextMessageFacade@be64738 }
Now you know how to use Apache Qpid JMS 2.0 API over AMQP using Solace messaging to send and receive persistent messages from a queue.