Topic to Queue Mapping
9 Minute Read
This tutorial builds on the basic concepts introduced in the Persistence with Queues tutorial and will show you how to make use of one of PubSub+’s advanced queueing features called “Topic to Queue Mapping.”
In addition to spooling messages published directly to the queue, it is possible to add one or more topic subscriptions to a durable queue so that messages published to those topics are also delivered to and spooled by the queue. This is a powerful feature that enables queues to participate equally in point to point and publish / subscribe messaging models. More details about the “Topic to Queue Mapping” feature here.
The following diagram illustrates this feature.
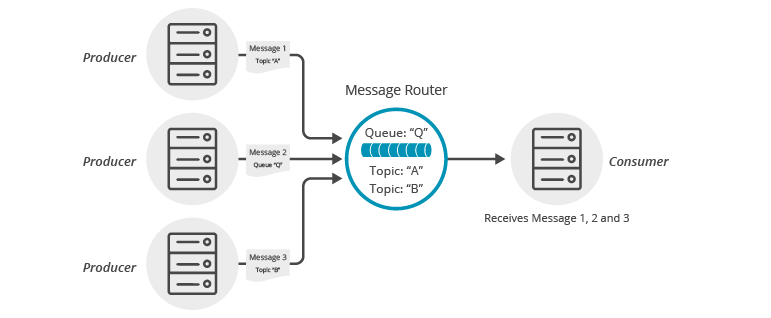
If you have a durable queue named Q, it will receive messages published directly to the queue destination named Q. However, it is also possible to add subscriptions to this queue in the form of topics. This example adds topics A and B. Once these subscriptions are added, the queue will start receiving messages published to the topic destinations A and B. When you combine this with the wildcard support provided by Solace topics this opens up a number of interesting use cases.
Assumptions
This tutorial assumes the following:
- You have access to Solace messaging with the following configuration details:
- Connectivity information for a Solace message-VPN configured for guaranteed messaging support
- Enabled client username and password
- Client-profile enabled with guaranteed messaging permissions.
One simple way to get access to Solace messaging quickly is to create a messaging service in Solace Cloud as outlined here. You can find other ways to get access to Solace messaging below.
Goals
The goal of this tutorial is to understand the following:
- How to add topic subscriptions to a queue. Two ways are shown in this case.
- How to interrogate the Solace Event Broker to confirm capabilities.
- How to delete a queue.
Get Solace Messaging
This tutorial requires access Solace messaging and requires that you know several connectivity properties about your Solace messaging. Specifically you need to know the following:
| Resources | Value | Description |
|---|---|---|
| Host | String | This is the address clients use when connecting to the Solace messaging to send and receive messages. (Format: DNS_NAME:Port or IP:Port) |
| Message VPN | String | The Solace message router Message VPN that this client should connect to. |
| Client Username | String | The client username. (See Notes below) |
| Client Password | String | The client password. (See Notes below) |
There are several ways you can get access to Solace Messaging and find these required properties.
Option 1: Use Solace Cloud
-
Follow these instructions to quickly spin up a cloud-based Solace messaging service for your applications.
-
The messaging connectivity information is found in the service details in the connectivity tab (shown below). You will need:
- Host:Port (use the SMF URI)
- Message VPN
- Client Username
- Client Password

Option 2: Start a Solace Event Broker Software
-
Follow these instructions to start the Solace Event Broker Software in leading Clouds, Container Platforms or Hypervisors. The tutorials outline where to download and how to install the Solace Event Broker Software.
-
The messaging connectivity information are the following:
-
Host: <public_ip> (IP address assigned to the VMR in tutorial instructions)
-
Message VPN: default
-
Client Username: sampleUser (can be any value)
-
Client Password: samplePassword (can be any value)
Note: By default, the Solace Event Broker Software "default" message VPN has authentication disabled.
-
Option 3: Get access to a Solace Event Broker Appliance
-
Contact your Solace Event Broker Appliance administrators and obtain the following:
- A Solace Message-VPN where you can produce and consume direct and persistent messages
- The host name or IP address of the Solace appliance hosting your Message-VPN
- A username and password to access the Solace appliance
Obtaining the Solace Messaging API
The latest versions of all Solace APIs can be downloaded from the solace downloads page. Otherwise, check the public samples repository of the API where the library is already packaged as a gzipped tar file. Note: always check for the latest API version!
Connecting to the Solace Event Broker
In order to send or receive messages, an application must connect a Solace session. The Solace session is the basis for all client communication with the Solace Event Broker.
In the Solace messaging API for C (SolClient), a few distinct steps are required to create and connect a Solace session.
- The API must be initialized
- Appropriate asynchronous callbacks must be declared
- A SolClient Context is needed to control application threading
- The SolClient session must be created
Initializing the CCSMP API
To initialize the SolClient API, you call the initialize method with arguments that control logging.
/* solClient needs to be initialized before any other API calls. */
solClient_initialize ( SOLCLIENT_LOG_DEFAULT_FILTER, NULL );
This call must be made prior to making any other calls to the SolClient API. It allows the API to initialize internal state and buffer pools.
SolClient Asynchronous Callbacks
The SolClient API is predominantly an asynchronous API designed for the highest speed and lowest latency. As such most events and notifications occur through callbacks. In order to get up and running, the following basic callbacks are required at a minimum.
static int msgCount = 0;

solClient_rxMsgCallback_returnCode_t
sessionMessageReceiveCallback ( solClient_opaqueSession_pt opaqueSession_p, solClient_opaqueMsg_pt msg_p, void *user_p )
{
    printf ( "Received message:\n" );
    solClient_msg_dump ( msg_p, NULL, 0 );
    printf ( "\n" );

    msgCount++;
    return SOLCLIENT_CALLBACK_OK;
}

void
sessionEventCallback ( solClient_opaqueSession_pt opaqueSession_p,
                solClient_session_eventCallbackInfo_pt eventInfo_p, void *user_p )
{
    printf("Session EventCallback() called:  %s\n", solClient_session_eventToString ( eventInfo_p->sessionEvent));
}
The messageReceiveCallback is invoked for each message received by the Session. In this sample, the message is printed to the screen.
The eventCallback is invoked for various significant session events like connection, disconnection, and other SolClient session events. In this sample, simply prints the events. See the SolClient API documentation and samples for details on the session events.
Context Creation
As outlined in the core concepts, the context object is used to control threading that drives network I/O and message delivery and acts as containers for sessions. The easiest way to create a context is to use the context initializer with default thread creation.
/* Context */
solClient_opaqueContext_pt context_p;
solClient_context_createFuncInfo_t contextFuncInfo = SOLCLIENT_CONTEXT_CREATEFUNC_INITIALIZER;

solClient_context_create ( SOLCLIENT_CONTEXT_PROPS_DEFAULT_WITH_CREATE_THREAD,
                           &context_p, &contextFuncInfo, sizeof ( contextFuncInfo ) );
Session Creation
Finally a session is needed to actually connect to the Solace Event Broker. This is accomplished by creating a properties array and connecting the session.
/* Session */
solClient_opaqueSession_pt session_p;
solClient_session_createFuncInfo_t sessionFuncInfo = SOLCLIENT_SESSION_CREATEFUNC_INITIALIZER;

/* Session Properties */
const char     *sessionProps[50] = {0, };
int             propIndex = 0;
char *username,*password,*vpnname,*host;

/* Configure the Session function information. */
sessionFuncInfo.rxMsgInfo.callback_p = sessionMessageReceiveCallback;
sessionFuncInfo.rxMsgInfo.user_p = NULL;
sessionFuncInfo.eventInfo.callback_p = sessionEventCallback;
sessionFuncInfo.eventInfo.user_p = NULL;

/* Configure the Session properties. */
propIndex = 0;
host = argv[1];
vpnname = argv[2];
username = strsep(&vpnname,"@");
password = argv[3];

sessionProps[propIndex++] = SOLCLIENT_SESSION_PROP_HOST;
sessionProps[propIndex++] = host;

sessionProps[propIndex++] = SOLCLIENT_SESSION_PROP_VPN_NAME;
sessionProps[propIndex++] = vpnname;

sessionProps[propIndex++] = SOLCLIENT_SESSION_PROP_USERNAME;
sessionProps[propIndex++] = username;

sessionProps[propIndex++] = SOLCLIENT_SESSION_PROP_PASSWORD;
sessionProps[propIndex++] = password;

sessionProps[propIndex++] = NULL;

/* Create the Session. */
solClient_session_create ( ( char ** ) sessionProps,
                           context_p,
                           &session_p, &sessionFuncInfo, sizeof ( sessionFuncInfo ) );

/* Connect the Session. */
solClient_session_connect ( session_p );
printf ( "Connected.\n" );
When creating the session, the factory method takes the session properties, the session pointer and information about the session callback functions. The API then creates the session within the supplied context and returns a reference in the session pointer. The final call to solClient_session_connect establishes the connection to the Solace Event Broker which makes the session ready for use.
At this point your client is connected to the Solace Event Broker. You can use Broker Manager to view the client connection and related details.
Review: Receiving message from a queue
The Persistence with Queues tutorial demonstrated how to publish and receive messages from a queue. This sample will do so in the same way. This sample will also depend on the endpoint being provisioned by through the API as was done in the previous tutorial. For clarity, this code is not repeated in the discussion but is included in the full source available in GitHub.
Adding a Subscription to a Queue
In order to enable a queue to participate in publish/subscribe messaging, you need to add topic subscriptions to the queue to attract messages. In this sample, adding a subscription is demonstrated in 2 ways:
- Through the session using
solClient_session_endpointTopicSubscribe - Through a created flow to the queue using
solClient_flow_topicSubscribeWithDispatch
    // Create a session

    // Subscribe through the Session
    const char     *props[40] = {0, };
    propIndex = 0;
    props[propIndex++] = SOLCLIENT_ENDPOINT_PROP_ID;
    props[propIndex++] = SOLCLIENT_ENDPOINT_PROP_QUEUE;
    props[propIndex++] = SOLCLIENT_ENDPOINT_PROP_NAME;
    props[propIndex++] = "Q";
    char* pTopic1 = "A";
    char* pTopic2 = "B";

    solClient_session_endpointTopicSubscribe ( (char**)props, session_p,
                                                SOLCLIENT_SUBSCRIBE_FLAGS_WAITFORCONFIRM,
                                                pTopic1 );
    // Create a flow to the queue

    // Subscribe through a flow
    solClient_flow_topicSubscribeWithDispatch ( flow_p,
                                                SOLCLIENT_SUBSCRIBE_FLAGS_WAITFORCONFIRM,
                                                pTopic2,
                                                NULL,       /* no dispatch functions */
                                                0           /* correlation tag pointer */
                                                );
Publish – Subscribe using a Queue
Once the subscription is added to the queue, all that is left to do in this tutorial is to send some messages to your topic and validate that they arrive on the queue.
    char* pTopic = "A" // or B
    solClient_opaqueMsg_pt msg_p = NULL;
    solClient_destination_t destination;

    // Allocate memory for the message to be sent.
    solClient_msg_alloc ( &msg_p );

    // Set the message delivery mode.
    solClient_msg_setDeliveryMode ( msg_p, SOLCLIENT_DELIVERY_MODE_PERSISTENT );

    // Set the destination. */
    destination.destType = SOLCLIENT_TOPIC_DESTINATION;
    destination.dest = pTopic;
    if ( (solClient_msg_setDestination ( msg_p, &destination, sizeof ( destination ) ) ) != SOLCLIENT_OK ) {
        solClient_session_sendMsg ( session_p, msg_p );
    }

    solClient_msg_free ( &msg_p );
Summarizing
The full source code for this example is available in GitHub. If you combine the example source code shown above results in the following source:
Building
Building these examples is simple.
For linux and mac
All you need is to execute the compile script in the build folder.
linux
build$ ./build_intro_linux_xxx.shmac
build$ ./build_intro_mac_xxx.shFor windows
You can either build the examples from DOS prompt or from Visual Studio IDE.
To build from DOS prompt, you must first launch the appropriate Visual Studio Command Prompt and then run the batch file
c:\solace-sample-c\build>build_intro_win_xxx.batReferencing the downloaded SolClient library include and lib file is required. For more advanced build control, consider adapting the makefile found in the "intro" directory of the SolClient package. The above samples very closely mirror the samples found there.
Running the Samples
- Start two
TopicSubscribersample in 2 separate terminals subscribing to topicmy/sample/topic/1andmy/sample/topic/2respectively. - Start
QueueSubscriberin another terminal subscribing to queuemy_sample_queue. - Start
TopicToQueueMappingin another terminal:
bin$ . ./setenv.sh
bin$ ./TopicToQueueMapping -u <client-username>@<message-vpn> -c <protocol>://<msg_backbone_ip>:<port> -p <password>
You will then see the queue and topic subscriber outputs as below:
On QueueSubscriber subscribing to my_sample_queue
Connected.
Waiting for messages......
Received message:
Destination:                            Topic 'my/sample/topic/1'
SenderId:                               ubuntu-xenial/XXXXX.......
SequenceNumber:                         1
SenderTimestamp:                        1547621987332 (Wed Jan 16 2019 06:59:47)
Class Of Service:                       COS_1
DeliveryMode:                           PERSISTENT
Message Id:                             1
Binary Attachment:                      len=16
  6d 79 20 61 74 74 61 63  68 65 64 20 64 61 74 61      my attac   hed data

Acknowledging message Id: 1.
Received message:
Destination:                            Topic 'my/sample/topic/2'
SenderId:                               ubuntu-xenial/XXXXX......
SequenceNumber:                         2
SenderTimestamp:                        1547621987334 (Wed Jan 16 2019 06:59:47)
Class Of Service:                       COS_1
DeliveryMode:                           PERSISTENT
Message Id:                             2
Binary Attachment:                      len=16
  6d 79 20 61 74 74 61 63  68 65 64 20 64 61 74 61      my attac   hed data

Acknowledging message Id: 2.
Exiting.
On TopicSubscriber subscribing to my/sample/topic/1
TopicSubscriber initializing...
Connected.
Waiting for message......
Received message:
Destination:                            Topic 'my/sample/topic/1'
SenderId:                               ubuntu-xenial/31886/#00000001/PsW7c5FyP1
SequenceNumber:                         1
SenderTimestamp:                        1547621987332 (Wed Jan 16 2019 06:59:47)
Class Of Service:                       COS_1
DeliveryMode:                           DIRECT
Message Id:                             1
Binary Attachment:                      len=16
  6d 79 20 61 74 74 61 63  68 65 64 20 64 61 74 61      my attac   hed data
On TopicSubscriber subscribing to my/sample/topic/2
opicSubscriber initializing...
Connected.
Waiting for message......
Received message:
Destination:                            Topic 'my/sample/topic/2'
SenderId:                               ubuntu-xenial/31886/#00000001/PsW7c5FyP1
SequenceNumber:                         2
SenderTimestamp:                        1547621987334 (Wed Jan 16 2019 06:59:47)
Class Of Service:                       COS_1
DeliveryMode:                           DIRECT
Message Id:                             2
Binary Attachment:                      len=16
  6d 79 20 61 74 74 61 63  68 65 64 20 64 61 74 61      my attac   hed data
You have now added a topic subscription to a queue and successfully published persistent messages to the topic and had them arrive on your Queue endpoint.