Message VPN with Queue – Java
9 Minute Read
This tutorial will guide you through the steps of creating a sample Java-based tool to administer basic message-VPNs and queues.
Goals
The goals of this tutorial are to:
- Introduce the Solace Element Management Protocol (SEMP) object model for Solace message-VPNs and its resources
- Demonstrate how to integrate the management of Solace Messaging into Java-based DevOps tools using the SEMP Java Client Library
Let's review the admin objectives:
- Creating message-VPNs is a convenient way to slice a Solace Messaging to separated independent virtual routers, multiplying its use. There are many use cases including security, controlled share of functionality and capacity. For developers, one way to make use of a message-VPN is to share a VMR with everyone having a dedicated message-VPN for development use. Once a message-VPN is created, the client can connect to it with the assigned username and password using basic internal authentication.
- Another common objective is to create a persistent queue as a message endpoint in the particular message-VPN. This resource is only visible to those connected to this message-VPN and it can store incoming guaranteed messages until consumed.
- The administrator may also want the ability to delete a queue or
- delete a message-VPN when no longer needed.
To accomplish this, we will create a set of tasks as building blocks that match the SEMP object model of the Solace Messaging and use a simple framework to demonstrate the integration and orchestration of these tasks to achieve above objectives. We will use the SEMP Java Client Library to implement these tasks, extending the concepts introduced in the Basic Operations - Java Client Library tutorial.
Assumptions
This tutorial assumes that you have access to a running Solace VMR with the following configuration:
- A management user authorized with a minimum access scope level of global/read-write.
One simple way to get access to a Solace Messaging system is to start a Solace VMR load as outlined here.
Trying it yourself
This tutorial is available in GitHub along with the other Solace SEMP Getting Started Examples.
At the end, this tutorial walks through downloading and running the sample from source.
Get Solace Messaging
This tutorial requires access Solace messaging and requires that you know several connectivity properties about your Solace messaging. Specifically you need to know the following:
| Resources | Value | Description |
|---|---|---|
| Host | String | This is the address clients use when connecting to the Solace messaging to send and receive messages. (Format: DNS_NAME:Port or IP:Port) |
| Message VPN | String | The Solace message router Message VPN that this client should connect to. |
| Client Username | String | The client username. (See Notes below) |
| Client Password | String | The client password. (See Notes below) |
There are several ways you can get access to Solace Messaging and find these required properties.
Option 1: Use Solace Cloud
-
Follow these instructions to quickly spin up a cloud-based Solace messaging service for your applications.
-
The messaging connectivity information is found in the service details in the connectivity tab (shown below). You will need:
- Host:Port (use the SMF URI)
- Message VPN
- Client Username
- Client Password

Option 2: Start a Solace Event Broker Software
-
Follow these instructions to start the Solace Event Broker Software in leading Clouds, Container Platforms or Hypervisors. The tutorials outline where to download and how to install the Solace Event Broker Software.
-
The messaging connectivity information are the following:
-
Host: <public_ip> (IP address assigned to the VMR in tutorial instructions)
-
Message VPN: default
-
Client Username: sampleUser (can be any value)
-
Client Password: samplePassword (can be any value)
Note: By default, the Solace Event Broker Software "default" message VPN has authentication disabled.
-
Option 3: Get access to a Solace Event Broker Appliance
-
Contact your Solace Event Broker Appliance administrators and obtain the following:
- A Solace Message-VPN where you can produce and consume direct and persistent messages
- The host name or IP address of the Solace appliance hosting your Message-VPN
- A username and password to access the Solace appliance
The SEMP object model of Solace message-VPNs and VPN resources
Here we introduce some important basic concepts that are required for the implementation of Solace Messaging management tasks using SEMP.
As described in the introduction, message-VPNs provide isolated messaging domains for exclusive use. You can read more about message-VPNs in the Solace Messaging Concepts document.
Solace Messaging management is divided into Router-global level and individual Message-VPN level management. A management user with global/read-write access scope is authorized for all router and all message-VPN level configurations, such as global configuration or administering a message-VPN. Conversely, VPN/read-write access scope only allows for management of objects that have an effect within the assigned VPN, such as configuring a queue. In this tutorial, we will use a management user with global/read-write access scope for all configurations. For more details, refer to the Management User Authentication/Authorization documentation.
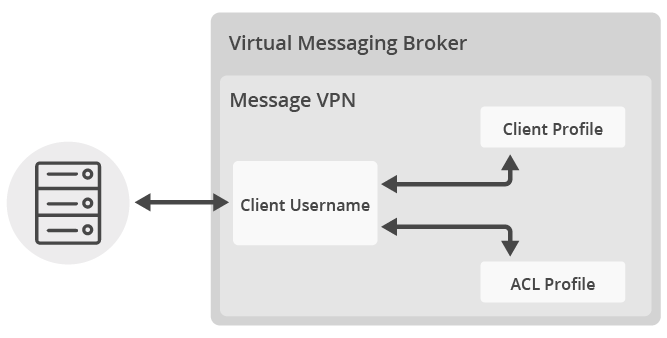
Clients can connect to a message-VPN and use its resources after proper authentication and authorization, controlled by the properties of the following SEMP objects on the Solace Messaging:
- The Message-VPN object defines the type and details of client authentication applied and restrictions to the combined resource usage of all VPN clients.
- A Client Profile object within a message-VPN defines resource usage restrictions applied to individual clients.
- An ACL (Access Control List) Profile object within a message-VPN defines access restrictions by listing allowance or denial of which clients can connect and to which topics and queues.
- A Client Username object within a message-VPN has an associated Client Profile and an ACL Profile. The username provided by the connecting client will be the Client Username applied to that connection or if it is not found then the default Client Username will be applied. The password property will be used if internal client authentication type has been specified for the message-VPN.
Once connected, clients can send messages to message-VPN endpoints, represented as Queue or Topic Endpoint SEMP objects within a message-VPN.
You can learn more about above SEMP objects by following the provided links to the Solace documentation.
Building blocks using the SEMP Java Client Library
Now we can start to implement the tasks as building blocks for the sample management tool.
Create a new message-VPN
The first task is to create a new message-VPN with a name. Consulting the Solace documentation by following above Message-VPN link, we determine that it shall be configured for basic internal authentication, have storage size increased for persistent message queues from default 0 and have it enabled. Tip: the Broker Manager GUI tool can be used to show the default values for new created objects.
To understand how to implement this, let’s consult the SEMP online API documentation:
- scrolling down to msgVPN and opening the
List Operationslink will show the color-coded options for all available operations. Clicking onPOST /msgVpns - Creates a Message VPN objectwill open up the details. Scrolling down toMsgVpn {, here we can find the names of the attributes and we can derive the setter/getter Java method names. For example we look up the attributeMaxMsgSpoolUsageand derive the setter method to besetMaxMsgSpoolUsage(int).
// Create message-vpn
MsgVpn msgVpn = new MsgVpn();
msgVpn.setMsgVpnName(messageVpnName);
msgVpn.setAuthenticationBasicType(AuthenticationBasicTypeEnum.INTERNAL);
msgVpn.setMaxMsgSpoolUsage(1500L);
msgVpn.setEnabled(true);
MsgVpnResponse vpnResp = sempApiInstance.createMsgVpn(msgVpn, null);
When a new message-VPN management object is created on the Solace Messaging system, a new default Client Username object will also be created automatically, associated with a new default Client Profile and a new default ACL Profile object. We will use these created default objects as a starting point for further configuration as they require fewer properties to modify. Alternatively, it is possible to create new non-default objects if a more complex structure is required.
The default ACL Profile doesn’t define any access restrictions so there is no need to modify that.
Modify the default Client Profile
However, the default Client Profile needs to be modified to enable support for guaranteed messaging:
// Modify existing default client-profile
String DEFAULT_CLIENTPROFILE = "default";
MsgVpnClientProfile clientProfile = new MsgVpnClientProfile();
clientProfile.setAllowGuaranteedMsgSendEnabled(true);
clientProfile.setAllowGuaranteedMsgReceiveEnabled(true);
clientProfile.setAllowGuaranteedEndpointCreateEnabled(true);
MsgVpnClientProfileResponse cpResp = sempApiInstance.updateMsgVpnClientProfile(messageVpnName,
 DEFAULT_CLIENTPROFILE, clientProfile, null);
Create new or modify the default Client Username
The Client Username needs to get a password property assigned and enabled. If we opt for using a specific username, we need to create a new Client Username. Note that unless a different Client Profile and ACL profile is assigned, even a newly created Client Username will be associated with the default profiles.
// Create or modify client-username
String DEFAULT_CLIENTUSERNAME = "default";
MsgVpnClientUsername clientUsername = new MsgVpnClientUsername();
clientUsername.setPassword(clientPassword);
clientUsername.setEnabled(true);
if (!clientName.equals(DEFAULT_CLIENTUSERNAME)) {
    // Create client-username if not default
    clientUsername.setClientUsername(clientName);
    MsgVpnClientUsernameResponse cuResp = sempApiInstance.createMsgVpnClientUsername(
    		messageVpnName, clientUsername, null);
} else {
    // Modify existing default client-username
    MsgVpnClientUsernameResponse cuResp = sempApiInstance.updateMsgVpnClientUsername(
    		messageVpnName, DEFAULT_CLIENTUSERNAME, clientUsername, null);
}
Create a Queue
Creating a Queue requires a unique name, permissions set, ingress enabled for receiving messages and egress enabled to send messages. Additional properties can be set to non-default values, as for the other objects. For example, in this tutorial we will change the default Exclusive access type of the created queue to Non-exclusive, which means that multiple clients can connect to this queue and messages will be delivered in a round-robin scheme, which can be useful for load-balancing between slow consumers. For more information of what is available, see the documentation of Configuring Queues and Configuring Topic Endpoints.
// Create queue
MsgVpnQueue queue = new MsgVpnQueue();
queue.setQueueName(queueName);
queue.setPermission(PermissionEnum.DELETE);
queue.setIngressEnabled(true);
queue.setEgressEnabled(true);
queue.setAccessType(AccessTypeEnum.NON_EXCLUSIVE);
MsgVpnQueueResponse qResp = sempApiInstance.createMsgVpnQueue(messageVpnName, queue, null);
Delete a Queue
Deleting a Queue is straightforward:
// Delete queue
SempMetaOnlyResponse resp = sempApiInstance.deleteMsgVpnQueue(messageVpnName, queueName);
Delete a message-VPN
Deleting a message-VPN requires first all queue resources assigned to the message-VPN to be deleted. We do that by querying the collection of queues within the message-VPN to be deleted and then iterating through the resulting list.
// Delete message-vpn - Prerequisite for delete VPN is to remove all queues
MsgVpnQueuesResponse resp = sempApiInstance.getMsgVpnQueues(messageVPNName, null, null, null,
    null);
List<MsgVpnQueue> queuesList = resp.getData();
if (queuesList.size() > 0) {
    System.out.format("Message-VPN contains one or more queues, deleting them first:\n");
    for (MsgVpnQueue queue: queuesList){
       	// Calling above Delete queue building block
       	deleteQueue(messageVPNName, queue.getQueueName());
    }
}
SempMetaOnlyResponse vpnResp = sempApiInstance.deleteMsgVpn(messageVPNName);
Pulling it all together
We can now implement the admin objectives in the sample Java-based command-line manageVPN tool. In this example, the tool will simply parse command-line parameters in its main method and perform the admin action passed using one or more of the building blocks. Real-world applications would likely use similar building blocks as a Java-library.
switch (command)  {
    case "create":
        app.createMessageVpn(messageVpnName);
        app.updateDefaultClientProfileForPersistentMessaging(messageVpnName);
        app.setupClientUsername(messageVpnName, vpnUserName, vpnUserPassword);
        // Additionally create a queue
        app.createQueue(messageVpnName, testQueueName);
        break;
    case "delete":
        app.deleteMessageVpn(messageVpnName);
        break;
Summary
The full source code for this example is available in GitHub. If you combine the example source code shown above results in the following source:
Getting the Source
Clone the GitHub repository containing the Solace samples.
git clone https://github.com/SolaceSamples/solace-samples-semp
cd solace-samples-semp/java
Building
Building the example is simple. You can simply build the project using Gradle.
The build instructions in this tutorial assume you are using a Linux shell. If your environment differs, adapt the instructions.
../gradlew buildThis builds the manageVPN tool with OS specific launch scripts. The files are staged in the build/staged directory.
Running the Sample
From the solace-samples-semp/java directory, replace <semp_base_path> by the SEMP base path, for example: http://solacevmr:8080/SEMP/v2/config, replace the <management_user> and <management_password> with your credentials and execute:
build/staged/bin/manageVPN create <semp_base_path> <management_user> <management_password> myNewVPNThis will create a new message-VPN called myNewVPN and also create a sample queue called testQueue. The credentials to connect to the new message-VPN are default:password, which can also be changed in the code if required.
A message-VPN can also be deleted when no longer needed:
build/staged/bin/manageVPN delete <semp_base_path> <management_user> <management_password> myNewVPNThis will detect that the queue testQueue and possibly other queues are still there so it will delete these first and then it will delete myNewVPN.
Now it is possible to easily create as many message-VPNs as required and share an installed VMR with other developers. To try a new message-VPN, use the Persistence with Queues sample. Follow the instructions to get the source, build and then run from the appropriate directory with the additional optional parameter of the message-VPN name:
./build/staged/bin/queueProducer <HOST> myNewVPN