Basic Operations - curl
9 Minute Read
This is a quick tutorial to help you get started with the SEMP. You can learn more about the SEMP API using the Online Documentation. These documents explain the API concepts and details about the REST API. Additionally developers will find the SEMP API Reference useful in understanding how to apply the concepts in this tutorial to other Solace Messaging objects.
Note: This tutorial applies to the SEMP API starting in version 2. For older versions of the SEMP API, you can see the Legacy SEMP Documentation.
The following examples use curl which is a simple command line tool which can easily send HTTP requests and print the response. Most programming languages have readily available libraries for HTTP. It should be easy enough to adapt the examples below to the programming language of your choosing.
Alternatively, it is also possible to use SEMP through a client library. If you are interested in using a client library, you can look at this Quick Start tutorial which provides steps for using a client library to make SEMP calls.
Assumptions
The examples below make a few assumptions for simplicity:
- These examples will work with a Client Username object to illustrate the various concepts. The concepts apply generally to all objects in SEMP.
- The SEMP username and password are
user:password - The Solace Messaging host and port are
solacevmr:8080 - The Solace message-VPN is
default
Get Solace Messaging
This tutorial requires access Solace messaging and requires that you know several connectivity properties about your Solace messaging. Specifically you need to know the following:
| Resources | Value | Description |
|---|---|---|
| Host | String | This is the address clients use when connecting to the Solace messaging to send and receive messages. (Format: DNS_NAME:Port or IP:Port) |
| Message VPN | String | The Solace message router Message VPN that this client should connect to. |
| Client Username | String | The client username. (See Notes below) |
| Client Password | String | The client password. (See Notes below) |
There are several ways you can get access to Solace Messaging and find these required properties.
Option 1: Use Solace Cloud
-
Follow these instructions to quickly spin up a cloud-based Solace messaging service for your applications.
-
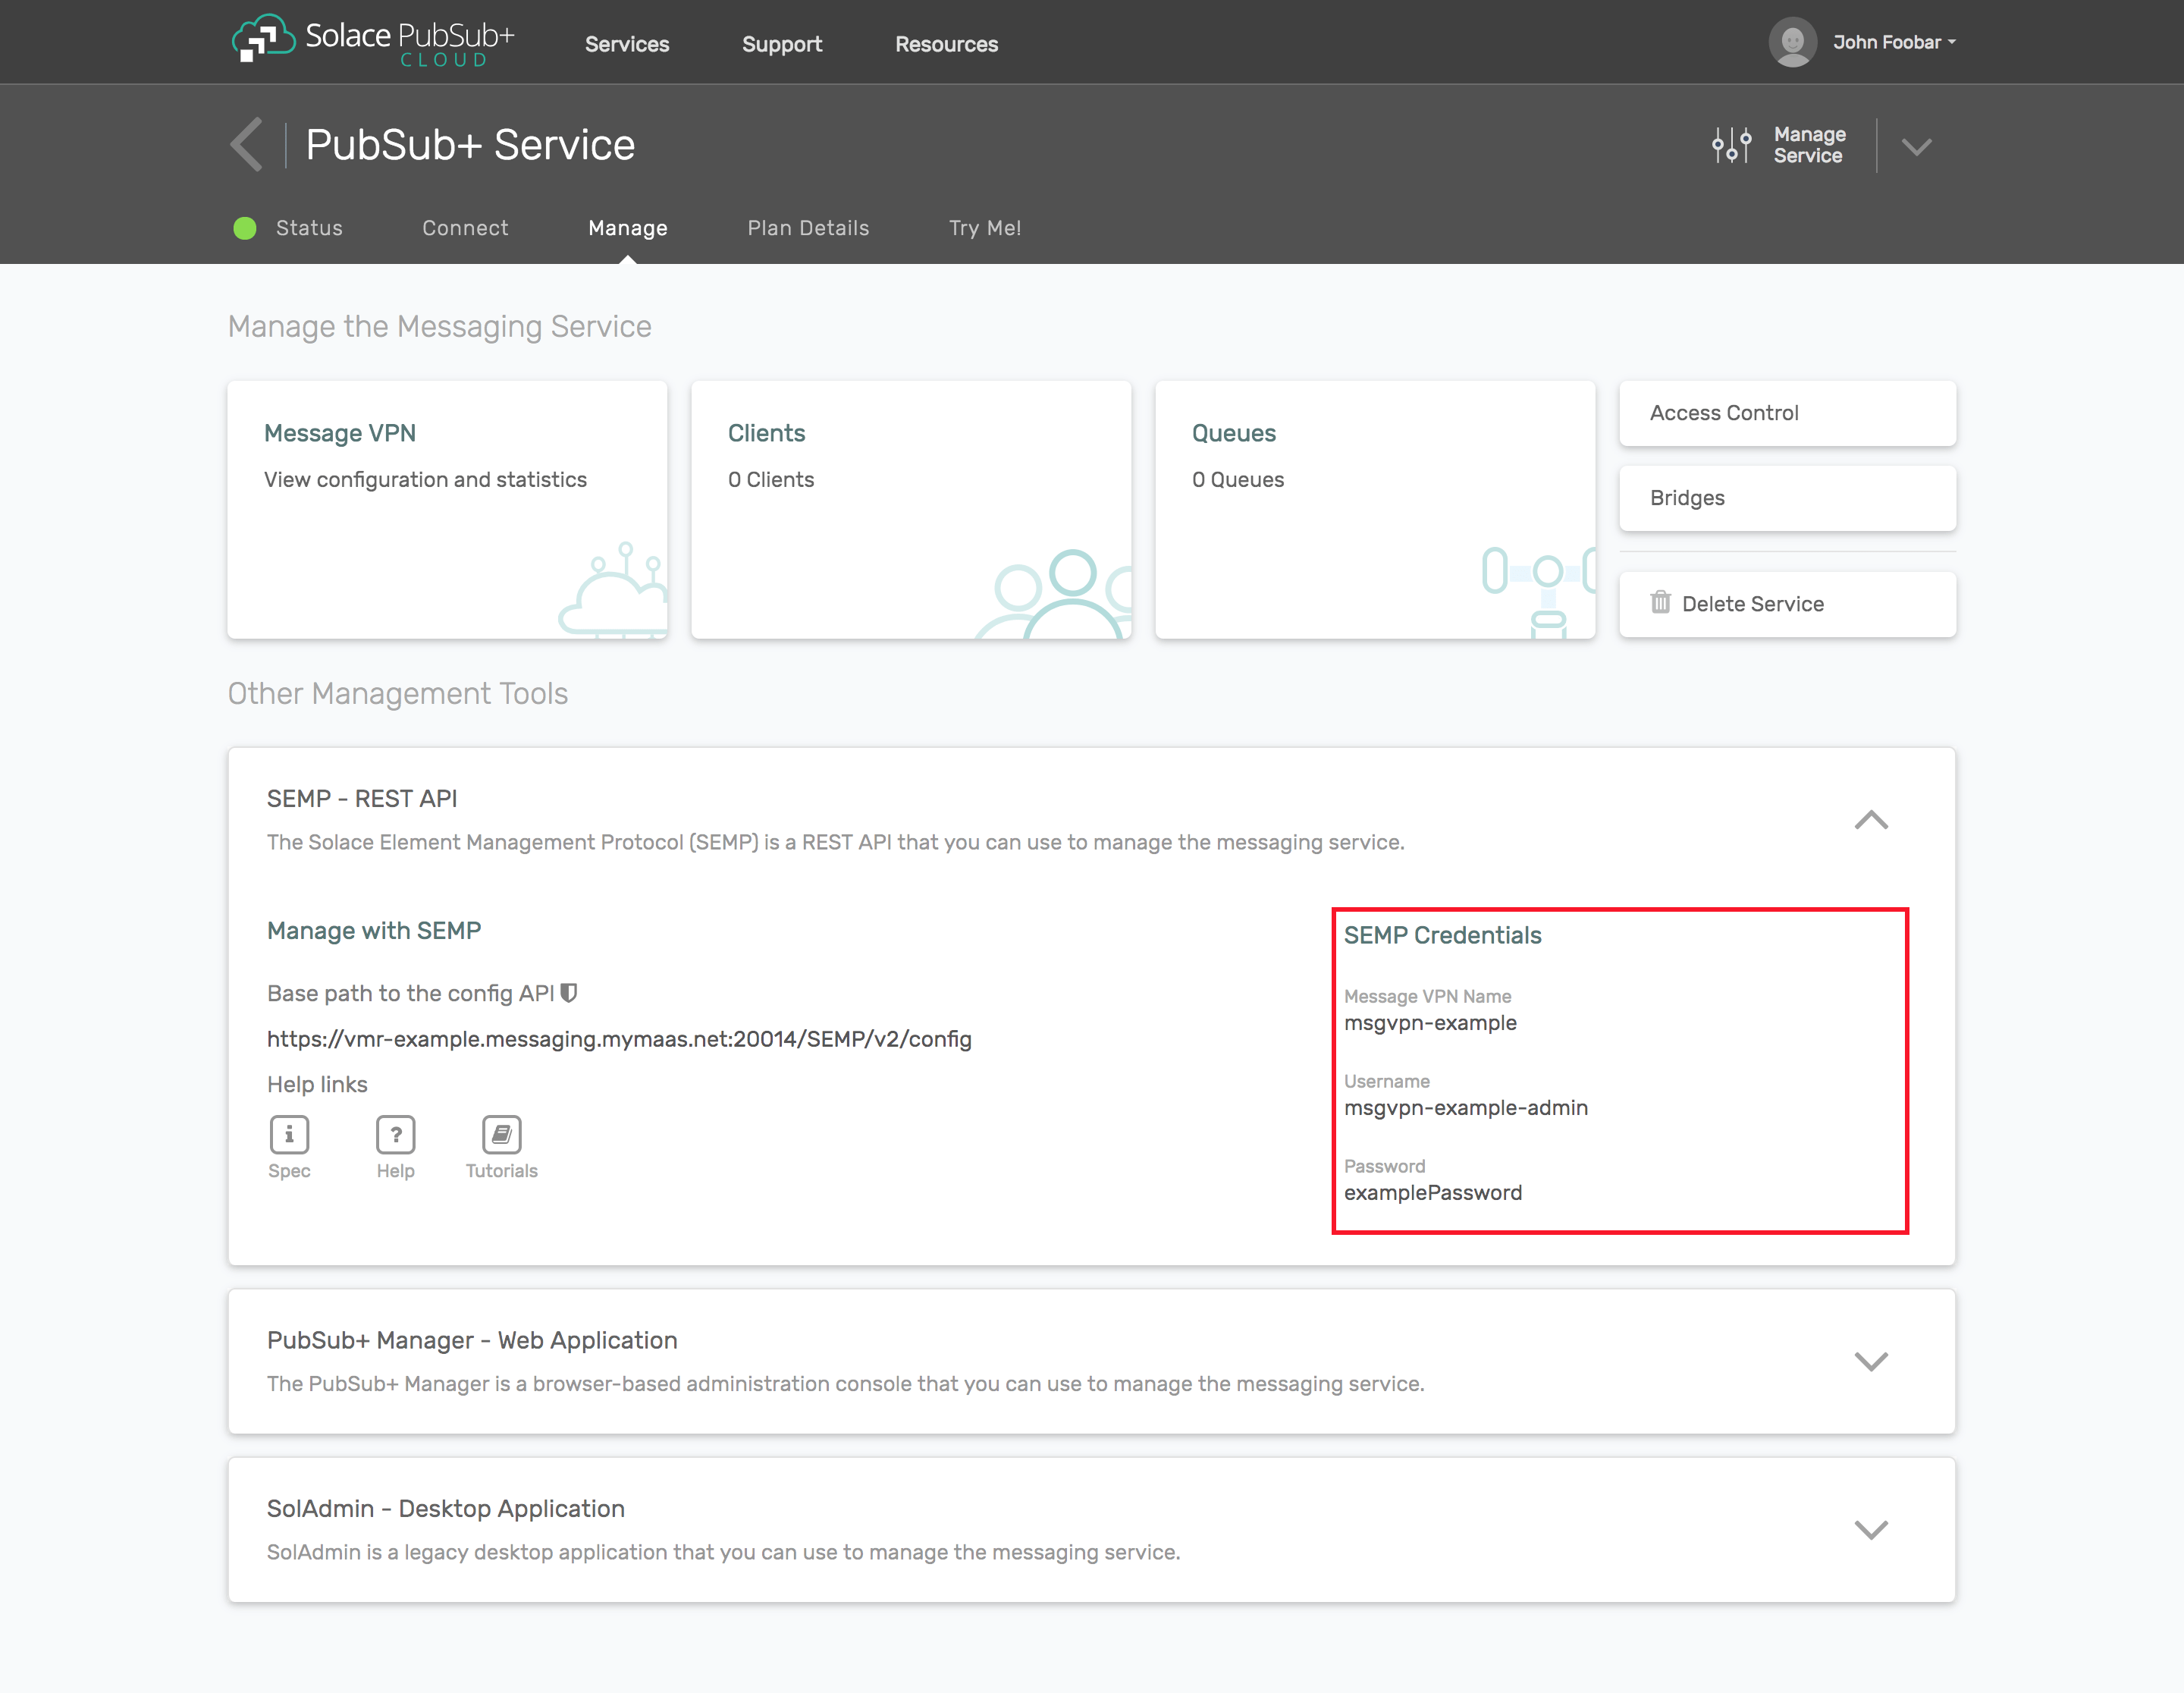
The messaging connectivity information is found in the service details in the connectivity tab (shown below). You will need:
- Host:Port (use the SMF URI)
- Message VPN
- Client Username
- Client Password
Option 2: Start a Solace Event Broker Software
-
Follow these instructions to start the Solace Event Broker Software in leading Clouds, Container Platforms or Hypervisors. The tutorials outline where to download and how to install the Solace Event Broker Software.
-
The messaging connectivity information are the following:
-
Host: <public_ip> (IP address assigned to the VMR in tutorial instructions)
-
Message VPN: default
-
Client Username: sampleUser (can be any value)
-
Client Password: samplePassword (can be any value)
Note: By default, the Solace Event Broker Software "default" message VPN has authentication disabled.
-
Option 3: Get access to a Solace Event Broker Appliance
-
Contact your Solace Event Broker Appliance administrators and obtain the following:
- A Solace Message-VPN where you can produce and consume direct and persistent messages
- The host name or IP address of the Solace appliance hosting your Message-VPN
- A username and password to access the Solace appliance
The Basics
Before jumping to a specific method and SEMP resource, let’s just introduce a few basic concepts that common across the API. If you have not already, you can learn more about these concepts and SEMP in general by checking out the API overview.
Objects in SEMP are represented by JSON. For example, if you want to create a Client Username called tutorialUser and enable this Client Username, you can use the following JSON.
{
    "clientUsername" : "tutorialUser",
    "enabled" : true
}
All Solace Messaging objects are addressed by a resource path that you specify in the URI. So for example let’s look at the URI for creating a Client Username.
solacevmr:8080/SEMP/v2/config/msgVpns/default/clientUsernamesIn this URI, the authority component is solacevmr:8080, which identifies the Solace Messaging system that you are interacting with. Then /SEMP/v2/config identifies that you are making a SEMP call and that you are using version 2 of the API config.
The remaining part of the URI, /msgVpns/default/clientUsernames, identifies that you are targeting Client Usernames collection within the “default” message-VPN.
Ok let’s get started...
Creating an object using POST
You create a Client Username from the clientUsernames collection within the message-VPN. The Client Username has only one required attribute, its name. In this example I’ve chosen tutorialUser. For interest, I will also enable the new Client Username so it is ready for messaging clients to use. During creation, any attributes that are not specified will be created using default values.
With curl, you can create a Client Username using an HTTP POST with the following command:
curl -X POST -u user:password solacevmr:8080/SEMP/v2/config/msgVpns/default/clientUsernames \
  -H "content-type: application/json" \
  -d '{"clientUsername":"tutorialUser","enabled":true}'
When you execute this command, if successful the Solace Messaging system will respond with content that resembles the following:
{
    "data":{
        "aclProfileName":"default",
        "clientProfileName":"default",
        "clientUsername":"tutorialUser",
        "enabled":true,
        "guaranteedEndpointPermissionOverride":false,
        "msgVpnName":"default",
        "subscriptionManager":false
    },
    "links":{
        "uri":"http://solacevmr:8080/SEMP/v2/config/msgVpns/default/clientUsernames/tutorialUser"
    },
    "meta":{
        "request":{
            "method":"POST",
            "uri":"http://solacevmr:8080/SEMP/v2/config/msgVpns/default/clientUsernames"
        },
        "responseCode":200
    }
}
The response contains three components. These are explained in more detail in the API concepts documentation. But here is a quick summary:
- Meta - The meta field contains information about the request that was sent, the response code from the Solace Messaging system and it will contain additional error information on failures.
- Links - The links object makes the API self-discoverable which can be nice for developers as they are coding. You can experiment with SEMP objects and use the links to navigate through collections to member objects etc. In general, this is simply a tool to aid in development because at runtime, most configuration management tools and applications follow known patterns and can directly address the resources. There is no need for this discoverability.
- Data - The data contains a full representation of the newly created object. Here you can see what default values were select by the Solace Messaging system etc.
Retrieving an object using GET
Now that you have created a Client Username, you can retrieve the object using an HTTP GET. The resource path for the tutorialUser Client Username created previously would be:
/msgVpns/default/clientUsernames/tutorialUserPutting that together with curl, you get the following command:
curl -X GET -u user:password solacevmr:8080/SEMP/v2/config/msgVpns/default/clientUsernames/tutorialUserWhen you retrieve a specific object from SEMP, the response will contain the expected, meta, links, and data fields with the data field being the full representation of the object.
{
    "data":{
        "aclProfileName":"default",
        "clientProfileName":"default",
        "clientUsername":"tutorialUser",
        "enabled":true,
        "guaranteedEndpointPermissionOverride":false,
        "msgVpnName":"default",
        "subscriptionManager":false
    },
    "links":{
        "uri":"http://solacevmr:8080/SEMP/v2/config/msgVpns/default/clientUsernames/tutorialUser"
    },
    "meta":{
        "request":{
            "method":"GET",
            "uri":"http://solacevmr:8080/SEMP/v2/config/msgVpns/default/clientUsernames/tutorialUser"
        },
        "responseCode":200
    }
}
Retrieving a collection of objects using GET
You can also retrieve all of the Client Usernames within the default Message VPN and you will see the newly created tutorialUser object as well as any others. For this, you perform an HTTP GET on the actual clientUsernames collection.
curl -X GET -u user:password solacevmr:8080/SEMP/v2/config/msgVpns/default/clientUsernamesIn this case, the response will contain a data object which will have a JSON array of clientUsername objects. For large collections the response will be paged. See SEMP paging for details.
{
    "data":[
        {
            "aclProfileName":"#acl-profile",
            "clientProfileName":"#client-profile",
            "clientUsername":"#client-username",
            "enabled":true,
            "guaranteedEndpointPermissionOverride":false,
            "msgVpnName":"default",
            "subscriptionManager":false
        },
        {
            "aclProfileName":"default",
            "clientProfileName":"default",
            "clientUsername":"default",
            "enabled":true,
            "guaranteedEndpointPermissionOverride":false,
            "msgVpnName":"default",
            "subscriptionManager":false
        },
        {
            "aclProfileName":"default",
            "clientProfileName":"default",
            "clientUsername":"tutorialUser",
            "enabled":true,
            "guaranteedEndpointPermissionOverride":false,
            "msgVpnName":"default",
            "subscriptionManager":false
        }
    ],
    "links":[
        {
            "uri":"http://solacevmr:8080/SEMP/v2/config/msgVpns/default/clientUsernames/%23client-username"
        },
        {
            "uri":"http://solacevmr:8080/SEMP/v2/config/msgVpns/default/clientUsernames/default"
        },
        {
            "uri":"http://solacevmr:8080/SEMP/v2/config/msgVpns/default/clientUsernames/tutorialUser"
        }
    ],
    "meta":{
        "request":{
            "method":"GET",
            "uri":"http://solacevmr:8080/SEMP/v2/config/msgVpns/default/clientUsernames"
        },
        "responseCode":200
    }
}
For developers, you can also notice that for collections, the links object will also be a JSON array containing the links for each clientUsername object.
Partially updating an object using PATCH
The HTTP PATCH method allows you to partially update a SEMP object, only the attributes that are specified are updated. So let’s disable the tutorialUser Client Username as an example of how PATCH can be used. The URI is the same as the GET, it is the specific address of the tutorialUser object. In the JSON body, you specify all attributes that you want updated. In this case just enabled and we will send a value of false.
curl -X PATCH  -u user:password solacevmr:8080/SEMP/v2/config/msgVpns/default/clientUsernames/tutorialUser \
  -H "content-type: application/json" \
  -d '{"enabled":false}'
The response back from the Solace Messaging system will again have the same format as the GET response. In the response, the object is still returned and in this case, you can see that the object is now disabled: "enabled":false.
  {
    "data":{
        "aclProfileName":"default",
        "clientProfileName":"default",
        "clientUsername":"tutorialUser",
        "enabled":false,
        "guaranteedEndpointPermissionOverride":false,
        "msgVpnName":"default",
        "subscriptionManager":false
    },
    "links":{
        "uri":"http://solacevmr:8080/SEMP/v2/config/msgVpns/default/clientUsernames/tutorialUser"
    },
    "meta":{
        "request":{
            "method":"PATCH",
            "uri":"http://solacevmr:8080/SEMP/v2/config/msgVpns/default/clientUsernames/tutorialUser"
        },
        "responseCode":200
    }
Fully updating an object using PUT
The HTTP PUT method is used to update an object to match the attributes specified. All attributes not specified are reset to default values. Again, the URI for the tutorialUser Client Username is the same URI as used in the GET and PATCH. For the purposes of an example, let’s reset the tutorialUser so that it is enabled and all other attributes are defaulted. The following curl would do this:
curl -X PUT  -u user:password solacevmr:8080/SEMP/v2/config/msgVpns/default/clientUsernames/tutorialUser \
  -H "content-type: application/json" \
  -d '{"clientUsername":"tutorialUser","enabled":true}'
As with other methods, the response format contains the meta, links, and data. In the data object, the full Client Username is represented. You can see that it is now enabled.
{
    "data":{
        "aclProfileName":"default",
        "clientProfileName":"default",
        "clientUsername":"tutorialUser",
        "enabled":true,
        "guaranteedEndpointPermissionOverride":false,
        "msgVpnName":"default",
        "subscriptionManager":false
    },
    "links":{
        "uri":"http://solacevmr:8080/SEMP/v2/config/msgVpns/default/clientUsernames/tutorialUser"
    },
    "meta":{
        "request":{
            "method":"PUT",
            "uri":"http://solacevmr:8080/SEMP/v2/config/msgVpns/default/clientUsernames/tutorialUser"
        },
        "responseCode":200
    }
}
Removing an object using DELETE
The HTTP DELETE method is used to remove an object. No content is required. All the details are provided in the URI. The following curl will delete the tutorialUser Client Username object.
curl -X DELETE -u user:password solacevmr:8080/SEMP/v2/config/msgVpns/default/clientUsernames/tutorialUserIn contrast to other methods, for the delete only the meta object is returned. The object is deleted from the system by the time the method returns.
{
    "meta":{
        "request":{
            "method":"DELETE",
            "uri":"http://solacevmr:8080/SEMP/v2/config/msgVpns/default/clientUsernames/tutorialUser"
        },
        "responseCode":200
    }
}
Examples
Here are some additional examples of frequently used configurations:
Creating a message-vpn
This will create a new mesage-vpn "MyMessageVpn" with no authentication (for development purposes only) and 100 MB message spool usage quota:
curl -X POST -u user:password solacevmr:8080/SEMP/v2/config/msgVpns \
  -H "content-type: application/json" \
  -d '{"msgVpnName":"MyMessageVpn","authenticationBasicType":"none","maxMsgSpoolUsage":100,"enabled":true}'
Creating a queue
This command will create a non-exclusive queue "MyQueue" on "MyMessageVpn":
curl -X POST -u user:password solacevmr:8080/SEMP/v2/config/msgVpns/MyMessageVpn/queues \
  -H "content-type: application/json" \
  -d '{"queueName":"MyQueue","accessType":"non-exclusive","egressEnabled":true,"ingressEnabled":true,"permission":"delete"}'
Summary
At this point, you have created, retrieved, updated and deleted a Client Username object using SEMP. The examples used curl to send and receive the HTTP requests, but you can adapt the steps to any programming language of your choice.
SEMP is an extensive API that lets you configure anything on your Solace Messaging so there is a lot more to understand. If you want to know more, either you can get more familiar with the SEMP concepts by checking out the Concepts Guide or you can see the full developer documentation for the API.