Obtaining JMS objects using JNDI
8 Minute Read
This tutorial outlines the use of Java Naming and Directory Interface (JNDI) to create JMS objects including ConnectionFactories and Topic or Queue destinations. The Publish/Subscribe and other tutorials use the approach of programmatically creating these JMS objects, which is usually recommended for developers but JNDI is also a good option which increases the portability of your JMS application code.
In this tutorial, we’ll follow the same flow as the Persistence with Queues tutorial but use JNDI to retrieve the JMS Objects.
Obtaining JMS objects using JNDI requires a lookup of a Solace messaging resource by its reference in a JNDI store and then creating a local JMS object from the information returned. With the local JMS object available, the client can start using the associated resource:
Solace messaging provides a JNDI service to make this integration easy, which we will use here. Alternatively, it is possible to use other JNDI standard compliant services, such as an LDAP-based JNDI store on a remote host as described in the Solace Documentation.
Assumptions
This tutorial assumes the following:
- You are familiar with Solace core concepts.
- You have an understanding or you can refer to the Persistence with Queues tutorial for
- the Java Messaging Service (JMS) basics
- how to send and receive a message using the JMS API
- how obtain the Solace JMS API
- You have access to Solace messaging with the following configuration details:
- Connectivity information for a Solace message-VPN configured for guaranteed messaging support
- Enabled client username and password
- Client-profile enabled with guaranteed messaging permissions.
- Admin level rights to configure the message-VPN
One simple way to get access to Solace messaging quickly is to create a messaging service in Solace Cloud as outlined here. You can find other ways to get access to Solace messaging below.
Goals
The goal of this tutorial is to demonstrate the use of JNDI as a way to create JMS objects. This tutorial will show you following steps:
- How to configure the JNDI service on Solace messaging
- How to retrieve a JMS Connection Factory using JNDI so the client can connect to Solace messaging
- How to lookup a JMS Queue destination object using JNDI so the client can publish or subscribe to it
Get Solace Messaging
This tutorial requires access Solace messaging and requires that you know several connectivity properties about your Solace messaging. Specifically you need to know the following:
| Resources | Value | Description |
|---|---|---|
| Host | String | This is the address clients use when connecting to the Solace messaging to send and receive messages. (Format: DNS_NAME:Port or IP:Port) |
| Message VPN | String | The Solace message router Message VPN that this client should connect to. |
| Client Username | String | The client username. (See Notes below) |
| Client Password | String | The client password. (See Notes below) |
There are several ways you can get access to Solace Messaging and find these required properties.
Option 1: Use Solace Cloud
-
Follow these instructions to quickly spin up a cloud-based Solace messaging service for your applications.
-
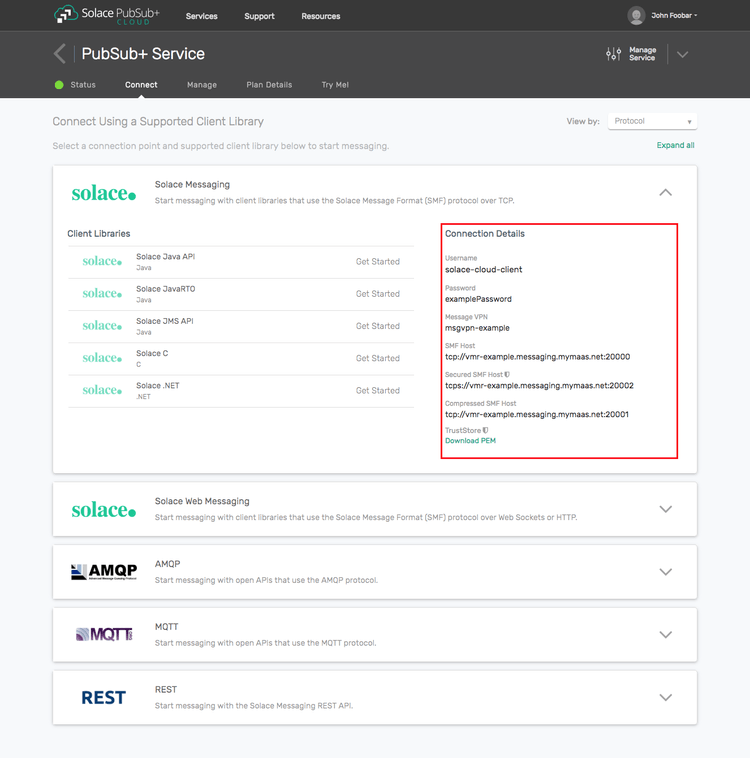
The messaging connectivity information is found in the service details in the connectivity tab (shown below). You will need:
- Host:Port (use the SMF URI)
- Message VPN
- Client Username
- Client Password

Option 2: Start a Solace Event Broker Software
-
Follow these instructions to start the Solace Event Broker Software in leading Clouds, Container Platforms or Hypervisors. The tutorials outline where to download and how to install the Solace Event Broker Software.
-
The messaging connectivity information are the following:
-
Host: <public_ip> (IP address assigned to the VMR in tutorial instructions)
-
Message VPN: default
-
Client Username: sampleUser (can be any value)
-
Client Password: samplePassword (can be any value)
Note: By default, the Solace Event Broker Software "default" message VPN has authentication disabled.
-
Option 3: Get access to a Solace Event Broker Appliance
-
Contact your Solace Event Broker Appliance administrators and obtain the following:
- A Solace Message-VPN where you can produce and consume direct and persistent messages
- The host name or IP address of the Solace appliance hosting your Message-VPN
- A username and password to access the Solace appliance
Obtaining the Solace Messaging API
The latest versions of all Solace APIs can be downloaded from the solace downloads page. Otherwise, check the public samples repository of the API where the library is already packaged as a gzipped tar file. Note: always check for the latest API version!
Step 1: Configuring the JNDI service
This tutorial will make use of the same two JMS objects as the Persistence with Queues:
- A ConnectionFactory object – Used by JMS clients to successfully connect to a message broker like a Solace message router
- A Queue Destination – Used for publishing and subscribing to messages.
This time we will take the approach of using JNDI lookup to create these objects.
Configuring the Solace Messaging
The following resources need to be configured through admin access to the Solace message-VPN:
| Resource | Value |
|---|---|
| Physical durable Queue | Q/tutorial |
| Connection Factory JNDI Reference | /JNDI/CF/GettingStarted |
| Queue JNDI Reference | /JNDI/Q/tutorial |
There are several ways to manage Solace messaging including:
- Command Line Interface (CLI)
- the Solace Element Management Protocol (SEMP) RESTful API
- the GUI-based Broker Manager application.
For simplicity in this tutorial, the following CLI script is provided. It will do the following:
- Ensure to start from a known command level, enable message-VPN configuration mode
home
enable
configure
- Create a durable queue, configure it and set the admin status for this queue. Here it will not throw an error message if the queue already exists.
message-spool message-vpn "VPNNAME"
! pragma:interpreter:ignore-already-exists
  create queue "Q/tutorial" primary
! pragma:interpreter:no-ignore-already-exists
    access-type "exclusive"
    permission all "delete"
    no shutdown
    exit
  exit
- Properly configure the default message-VPN with the necessary JNDI configuration. This script assumes the JNDI connection factory and queue do not exist and creates them. If the JNDI connection factory or queue already exists you may need to remove the keyword “create” from the script below. The script also sets the properties of the JNDI connection factory, which will apply to the connections created when using it. Also notice how the JNDI queue reference is linked to the physical queue.
jndi message-vpn "VPNNAME"
  create connection-factory "/JNDI/CF/GettingStarted"
    property-list "messaging-properties"
        property "text-msg-xml-payload" "false"
        property "default-delivery-mode" "persistent"
        exit
    exit

  create queue "/JNDI/Q/tutorial"
      property "physical-name" "Q/tutorial"
      exit
  exit
To apply this configuration, simply log in to Solace messaging CLI as an admin user and paste the above script fragments into the CLI, replacing VPNNAME to match that of your Solace messaging solution.
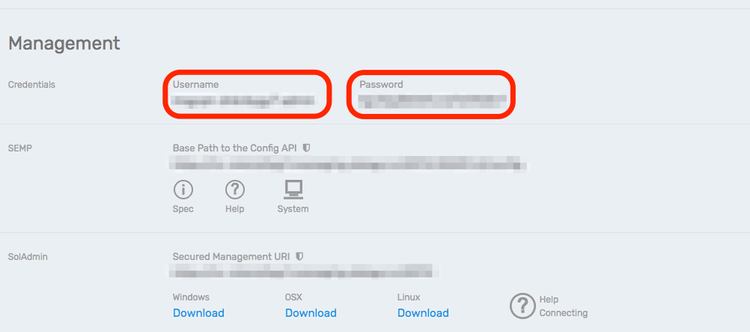
If connecting using Solace Cloud, obtain your management credentials by scrolling down to the Management section on the Connectivity tab
ssh <management-username>@<HOST> -p 2222
Solace - Virtual Message Router (VMR)
Password:
If using a VMR load, log in to the Solace message router CLI as an admin user with the default admin password.
ssh admin@<HOST>
Solace - Virtual Message Router (VMR)
Password:
See the Solace Documentation - Solace Router CLI for more details.
To learn how to use the SEMP API, refer to the Solace Element Management Protocol (SEMP) tutorials. To learn about the Broker Manager application, refer to the Solace Documentation - Broker Manager Overview and the application's online Help.
Step 2: Obtaining a JMS ConnectionFactory object using JNDI
In order to send or receive messages, an application must connect Solace messaging using a ConnectionFactory. The following code shows how to obtain a ConnectionFactory JMS object using Solace JNDI.
final String CONNECTION_FACTORY_JNDI_NAME = "/JNDI/CF/GettingStarted";

String[] split = args[1].split("@");

String host = args[0];
String vpnName = split[1];
String username = split[0];
String password = args[2];

Hashtable<String, Object> env = new Hashtable<String, Object>();
env.put(InitialContext.INITIAL_CONTEXT_FACTORY, "com.solacesystems.jndi.SolJNDIInitialContextFactory");
env.put(InitialContext.PROVIDER_URL, host);
env.put(Context.SECURITY_PRINCIPAL, username + '@' + vpnName);
env.put(Context.SECURITY_CREDENTIALS, password);

InitialContext initialContext = new InitialContext(env);
ConnectionFactory connectionFactory = (ConnectionFactory) initialContext.lookup(CONNECTION_FACTORY_JNDI_NAME);
JMS Properties
This is a good place to talk about the JMS Properties, which provide access to Solace JMS API functionality that extends the JMS standard.
JMS Properties can be used to:
- Configure the JNDI or JMS data connection properties such as security, connection retry or timeouts
- Set message or message delivery properties, such as marking a message as a Reply Message, as seen in the Request/Reply tutorial.
- Set general API properties, such as when Dynamic Durables were set to enable dynamic creation of a resource in the Persistence with Queues tutorial.
JMS Properties can be passed to the API in several ways, allowing flexibility to have them preset or a runtime setting. Here we show the use of Username as a JMS Property, which the JMS standard does not define.
Following example used above shows the configuration of the JNDI connection runtime with the Username through Initial Context:
env.put(Context.SECURITY_PRINCIPAL, "my-username");The created ConnectionFactory will inherit this, but it could be overridden using the created SolConnectionFactory object, allowing for a different username to be used for the data connection:
connectionFactory.setUsername("my-username");Same could have been predefined as a JVM level System property and used as default if it was not provided by the above two options:
-Djava.naming.security.principal=my-usernameOr it could have also been taken as preset default from a jndi.properties file on the CLASSPATH, which has following line included:
java.naming.security.principal=my-usernameSome JMS properties can even be configured on Solace messaging and the API will use this setting as a default, for example when the JNDI connection factory Delivery Mode property was set by the CLI script:
property "default-delivery-mode" "persistent"The Solace JMS Documentation - JMS Properties Reference provides detailed description of the use and the list of all JMS properties with options how to configure them. It is recommended to carefully consider the effect of the JMS Properties applied in order to achieve the desired configuration goal.
Connecting to the Solace Messaging
Next, the 'ConnectionFactory' can be used the same way as described in the Persistence with Queues tutorial to create a JMS Connection, at which point your client is connected to Solace messaging and can create a JMS Session.
Connection connection = connectionFactory.createConnection();
final Session session = connection.createSession(false, SupportedProperty.SOL_CLIENT_ACKNOWLEDGE);
Step 3: Obtaining JMS Destination objects using JNDI
A Queue or Topic destination is needed to send and receive messages. When using JNDI, destination objects are looked up by their JNDI reference.
Following code will obtain a Queue for the Persistence with Queues scenario:
final String QUEUE_NAME = "Q/tutorial";
final String QUEUE_JNDI_NAME = "/JNDI/" + QUEUE_NAME;
Queue queue = (Queue) initialContext.lookup(QUEUE_JNDI_NAME);
In contrast to the Persistence with Queues tutorial, the physical queue resource name Q/tutorial is not used here directly; it has been associated with /JNDI/Q/tutorial when the JNDI reference was created by the CLI script. Also note that same CLI script has already administratively created the physical queue object behind Q/tutorial and the Dynamic Durables JMS Property does not need to be enabled to automatically create it.
Sending and Receiving messages to a queue
Once the JMS queue object has been created using JNDI, producers and consumers can use it to send and receive messages the same way as described in the Persistence with Queues and other tutorials.
Summarizing
The full source code for this example is available in GitHub. If you combine the example source code shown above results in the following source:
Getting the Source
Clone the GitHub repository containing the Solace samples.
git clone https://github.com/SolaceSamples/solace-samples-jms
cd solace-samples-jms
Building
Building these examples is simple. You can simply build the project using Gradle.
./gradlew assembleThis builds all of the JMS Getting Started Samples with OS specific launch scripts. The files are staged in the build/staged directory.
Running the Sample
First start the QueueProducerJNDI to send a message to the queue. Then you can use the QueueConsumerJNDI sample to receive the messages from the queue.
$ ./build/staged/bin/queueProducerJNDI <host:port> <client-username>@<message-vpn> <client-password>
$ ./build/staged/bin/queueConsumerJNDI <host:port> <client-username>@<message-vpn> <client-password>
You have now successfully connected a client, sent persistent messages to a queue and received them from a consumer flow.

