Request/Reply
8 Minute Read
This tutorial outlines both roles in the request-response message exchange pattern. It will show you how to act as the client by creating a request, sending it and waiting for the response. It will also show you how to act as the server by receiving incoming requests, creating a reply and sending it back to the client. It builds on the basic concepts introduced in publish/subscribe tutorial.
Assumptions
This tutorial assumes the following:
-
You are familiar with Solace core concepts.
-
You have access to Solace messaging with the following configuration details:
- Connectivity information for a Solace message-VPN
- Enabled client username and password
One simple way to get access to Solace messaging quickly is to create a messaging service in Solace Cloud as outlined here. You can find other ways to get access to Solace messaging below.
Goals
The goal of this tutorial is to understand the following:
- On the requestor side:
- How to create a request
- How to receive a response
- How to use the Solace JMS API to correlate the request and response
- On the replier side:
- How to detect a request expecting a reply
- How to generate a reply message
Java Messaging Service (JMS) Introduction
JMS is a standard API for sending and receiving messages. As such, in addition to information provided on the Solace developer portal, you may also look at some external sources for more details about JMS. The following are good places to start
- https://docs.oracle.com/javaee/7/api/javax/jms/package-summary.html
- https://en.wikipedia.org/wiki/Java_Message_Service
- https://docs.oracle.com/javaee/7/tutorial/partmessaging.htm#GFIRP3
The oracle link points you to the JavaEE official tutorials which provide a good introduction to JMS. This getting started tutorial follows a similar path and shows you the Solace specifics that you need to do to get this working with Solace messaging.
Overview
Request-reply messaging is supported by Solace messaging for all delivery modes. The JMS API does provide a TopicRequestor and QueueRequestor interface which is very simple. However, this interface lacks the ability to timeout the requests. This limitation means that it is often simpler to implement the request – reply pattern in your application. This tutorial will follow this approach.
It is also possible to use guaranteed messaging for request reply scenarios. In this case the replier can listen on a queue for incoming requests and the requestor can use a temporary endpoint to attract replies. This is explained further in the Solace product documentation and shown in the API samples named SolJMSRRGuaranteedRequestor and SolJMSRRGuaranteedReplier.
Message Correlation
For request-reply messaging to be successful it must be possible for the requestor to correlate the request with the subsequent reply. Solace messages support two fields that are needed to enable request-reply correlation. The reply-to field can be used by the requestor to indicate a Solace Topic or Queue where the reply should be sent. In JMS, a natural choice for this is a temporary queue. The second requirement is to be able to identify the reply message within the stream of incoming messages. This is accomplished using the correlation-id field. This field will transit the Solace messaging system unmodified. Repliers can include the same correlation-id in a reply message to allow the requestor to detect the corresponding reply. The figure below outlines this exchange.
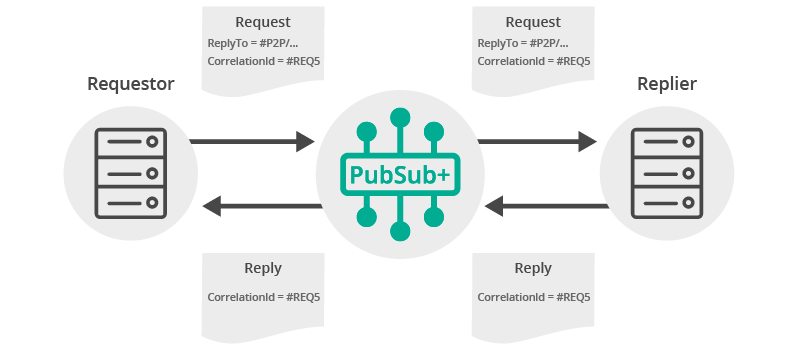
Note: In JMS it also common for the requestor to put a unique message ID into the message on send and have the replier respond with this message ID in the correlation ID field of the response message. This is equally possible with the Solace JMS API. This tutorial favors the correlation ID approach because it works commonly with all Solace messaging APIs.
Get Solace Messaging
This tutorial requires access Solace messaging and requires that you know several connectivity properties about your Solace messaging. Specifically you need to know the following:
| Resources | Value | Description |
|---|---|---|
| Host | String | This is the address clients use when connecting to the Solace messaging to send and receive messages. (Format: DNS_NAME:Port or IP:Port) |
| Message VPN | String | The Solace message router Message VPN that this client should connect to. |
| Client Username | String | The client username. (See Notes below) |
| Client Password | String | The client password. (See Notes below) |
There are several ways you can get access to Solace Messaging and find these required properties.
Option 1: Use Solace Cloud
-
Follow these instructions to quickly spin up a cloud-based Solace messaging service for your applications.
-
The messaging connectivity information is found in the service details in the connectivity tab (shown below). You will need:
- Host:Port (use the SMF URI)
- Message VPN
- Client Username
- Client Password

Option 2: Start a Solace Event Broker Software
-
Follow these instructions to start the Solace Event Broker Software in leading Clouds, Container Platforms or Hypervisors. The tutorials outline where to download and how to install the Solace Event Broker Software.
-
The messaging connectivity information are the following:
-
Host: <public_ip> (IP address assigned to the VMR in tutorial instructions)
-
Message VPN: default
-
Client Username: sampleUser (can be any value)
-
Client Password: samplePassword (can be any value)
Note: By default, the Solace Event Broker Software "default" message VPN has authentication disabled.
-
Option 3: Get access to a Solace Event Broker Appliance
-
Contact your Solace Event Broker Appliance administrators and obtain the following:
- A Solace Message-VPN where you can produce and consume direct and persistent messages
- The host name or IP address of the Solace appliance hosting your Message-VPN
- A username and password to access the Solace appliance
Obtaining the Solace Messaging API
The latest versions of all Solace APIs can be downloaded from the solace downloads page. Otherwise, check the public samples repository of the API where the library is already packaged as a gzipped tar file. Note: always check for the latest API version!
JMS administered objects
This tutorial will make use of two JMS administered objects:
- A ConnectionFactory object – Used by JMS clients to successfully connect to a message broker like Solace messaging
- A Queue Destination – Used for publishing and subscribing to messages. This example will use the topic
T/GettingStarted/requests
As described in the publish/subscribe tutorial we will use the approach of programmatically creating the required objects.
Connecting a session to Solace Messaging
As with other tutorials, this tutorial requires a JMS Connection connected to the default message VPN of a Solace VMR which has authentication disabled. So the only required information to proceed is the Solace VMR host string which this tutorial accepts as an argument. Connect the JMS Connection as outlined in the publish/subscribe tutorial.
Making a request
First let’s look at the requestor. This is the application that will send the initial request message and wait for the reply.
In order to be able to receive the response message back from the Replier, the Requestor must setup a JMS Consumer. For simplicity, this tutorial will use a blocking Consumer to receive the response messages using a temporary queue.
TemporaryQueue replyToQueue = session.createTemporaryQueue();
MessageConsumer replyConsumer = session.createConsumer(replyToQueue);
connection.start();
With the connection started, now the Requestor is ready to receive any reply messages on its temporary JMS Queue. Next you must create a message and the topic to send the message to. This is done in the same way as illustrated in the publish/subscribe tutorial.
final String REQUEST_TOPIC_NAME = "T/GettingStarted/requests";
Topic requestTopic = session.createTopic(REQUEST_TOPIC_NAME);
MessageProducer requestProducer = session.createProducer(requestTopic);
TextMessage request = session.createTextMessage("Sample Request");
request.setJMSReplyTo(replyToQueue);
String correlationId = UUID.randomUUID().toString();
request.setJMSCorrelationID(correlationId);
The difference in the above versus the publish/subscribe tutorial is that now you are setting the JMSReplyTo and JMSCorrelationID fields of the message. The JMSReplyTo specifies how the Replier application should respond. The above code is using the temporary queue that was just created. The JMSCorrelationID is the unique ID used to correlate requests with responses. The above code is simply using a randomly generated unique identifier.
Finally send the request and wait for the response. This example demonstrates a blocking call where the method will wait for the response message to be received.
final int REPLY_TIMEOUT_MS = 10000; // 10 seconds
requestProducer.send(requestTopic, request, DeliveryMode.NON_PERSISTENT,
        Message.DEFAULT_PRIORITY,
        Message.DEFAULT_TIME_TO_LIVE);
Message reply = replyConsumer.receive(REPLY_TIMEOUT_MS);

if (reply == null) {
    System.out.println("Failed to receive a reply in " + REPLY_TIMEOUT_MS + " msecs");
}
If no response is received within the timeout specified (10 seconds in this example), then the API will return a null message.
Replying to a request
Now it is time to receive the request and generate an appropriate reply.
Just as with previous tutorials, you still need to connect a JMS Connection and Session and create a MessageConsumer to receive request messages. However, in order to send replies back to the requestor, you will also need a MessageProducer. The following code will create the producer and consumer that is required.
final String REQUEST_TOPIC_NAME = "T/GettingStarted/requests";
Topic requestTopic = session.createTopic(REQUEST_TOPIC_NAME);
MessageConsumer requestConsumer = session.createConsumer(requestTopic);
final MessageProducer replyProducer = session.createProducer(null);
Then you simply have to modify the onMessage() method of the MessageConsumer from the publish/subscribe tutorial to inspect incoming messages and generate appropriate replies.
For example, the following code will send a response to all messages that have a reply-to field. It will copy over any JMSCorrelationID found in the incoming messages. It will also set a Solace specific boolean field indicating this message is a reply message. This is a Solace extension to enable JMS applications to exchange requests and replies easily with applications using other Solace APIs.
public void onMessage(Message request) {
    try {
        Destination replyDestination = request.getJMSReplyTo();
        if (replyDestination != null) {

            TextMessage reply = session.createTextMessage();
            String text = "Sample response";
            reply.setText(text);
            reply.setJMSCorrelationID(request.getJMSCorrelationID());
            reply.setBooleanProperty(SupportedProperty.SOLACE_JMS_PROP_IS_REPLY_MESSAGE, Boolean.TRUE);

            replyProducer.send(replyDestination, reply, DeliveryMode.NON_PERSISTENT,
                    Message.DEFAULT_PRIORITY,
                    Message.DEFAULT_TIME_TO_LIVE);

            latch.countDown(); // unblock the main thread
        } else {
            System.out.println("Received message without reply-to field.");
        }
    } catch (JMSException ex) {
        System.out.println("Error processing incoming message.");
        ex.printStackTrace();
    }
}
Receiving the Reply Message
All that’s left is to receive and process the reply message as it is received at the requestor. If you now add the following to your Requestor code you will see each reply printed to the console.
if (reply.getJMSCorrelationID() == null) {
    throw new Exception(
            "Received a reply message with no correlationID. This field is needed for a direct request.");
}

// Apache Qpid JMS prefixes correlation ID with string "ID:" so remove such prefix for interoperability
if (!reply.getJMSCorrelationID().replaceAll("ID:", "").equals(correlationId)) {
    throw new Exception("Received invalid correlationID in reply message.");
}

if (reply instanceof TextMessage) {
    System.out.printf("TextMessage response received: '%s'%n", ((TextMessage) reply).getText());
    if (!reply.getBooleanProperty(SupportedProperty.SOLACE_JMS_PROP_IS_REPLY_MESSAGE)) {
        System.out.println("Warning: Received a reply message without the isReplyMsg flag set.");
    }
} else {
    System.out.println("Message response received.");
}

System.out.printf("Message Content:%n%s%n", SolJmsUtility.dumpMessage(reply));
Summarizing
The full source code for this example is available in GitHub. If you combine the example source code shown above results in the following source:
Getting the Source
Clone the GitHub repository containing the Solace samples.
git clone https://github.com/SolaceSamples/solace-samples-jms
cd solace-samples-jms
Building
Building these examples is simple. You can simply build the project using Gradle.
./gradlew assembleThis builds all of the JMS Getting Started Samples with OS specific launch scripts. The files are staged in the build/staged directory.
Running the Sample
First start the BasicReplier so that it is up and listening for requests. Then you can use the BasicRequestor sample to send requests and receive replies.
$ ./build/staged/bin/basicReplier <host:port> <client-username>@<message-vpn> <client-password>
$ ./build/staged/bin/basicRequestor <host:port> <client-username>@<message-vpn> <client-password>
With that you now know how to successfully implement the request-reply message exchange pattern using JMS NON-PERSISTENT messages and temporary endpoints.